Android
Integrating with Judopay
Prerequisites
-
You have set up your Judopay account.
-
You have the latest version of the Android SDK.
For Mobile apps, it is recommended not to make a transaction from the app, as the Token and Secret could become compromised.
Use the server to make the transaction. Create a Register Card app and enable the Register Card Transactions permission.
Integration Requirements:
-
Android Studio 2.2 or higher
-
Android SDK Build Tools 25.0.2
-
Your app targets Android Kitkat 4.4 API 19 or higher
-
Latest Android Support Repository
-
Latest Android Support Library
-
Install using Android Studio
-
No need to clone a repository
The Mobile SDK is available for Android as a Gradle dependency.
To add Judopay as a dependency to your current project:
-
Navigate to your build.gradle file
-
In the dependencies section add the latest
com.judopay:judokit-android:{version}For the latest version, see Android Releases.
android {
    ...
}

dependencies {
    ...
    implementation 'com.judopay:judokit-android:2.1.1'
    ...
}
-
Ensure the Maven Central Repository has been added:
allprojects {
    repositories {
        mavenCentral()
    }
}
See Judopay's JudoKit for Android on Github.
Initialising the Judo Builder
The Judo builder is at the heart of the Android Mobile SDK. This class is responsible for:
-
Setting all the required parameters
-
Customising the payment flow
-
Import some of the classes and properties from the com.judopay.judokit.android package as detailed below:
import com.judopay.judokit.android.Judo
import com.judopay.judokit.android.model.Amount
import com.judopay.judokit.android.model.Reference
import com.judopay.judokit.android.model.PaymentWidgetType
import com.judopay.judokit.android.PAYMENT_CANCELLED
import com.judopay.judokit.android.PAYMENT_ERROR
import com.judopay.judokit.android.PAYMENT_SUCCESS
import com.judopay.judokit.androidJudoActivity-
Judo is the class used to build the payment flow.
-
Amount and Reference: Classes used to set the amount and reference properties.
-
PaymentWidgetType allows for multiple payment types:
-
Card
-
Google Pay™
-
Apple Pay™
-
PayByBankApp
-
iDeal
to be selected and displayed.
-
-
Identifies the transaction result:
-
PAYMENT_SUCCESS
-
PAYMENT_ERROR
-
PAYMENT_CANCELLED
-
-
android.JudoActivity is the method parameter when calling startActivityForResult.
Building the Judo Object
To set up the transaction amount:
-
In the Amount object provide the Amount value and Currency type:
val amount = Amount.Builder()
     .setAmount("150.50")
     .setCurrency(Currency.GBP)
     .build()
To set up the transaction reference:
-
In the Reference object provide the ConsumerReference string:
val reference = Reference.Builder()
    .setConsumerReference('my-consumer-reference')
    .build()
To set up the Judo configuration:
-
Set the following required parameters:
-
The token and secret values, OR Create the authorisation object:
-
Set the SDK to run in sandbox mode
-
-
Set the following objects:
-
Judo ID
-
Authorisation object (if using this method)
-
JudoId format = 100100100
Amount
Reference
val authorization = PaymentSessionAuthorization.Builder()
       .setPaymentSession(paymentSession)
       .setApiToken(token)
.build()-
Set the authorisation object when invoking Judo builder:
val builder = Judo.Builder(widgetType)
            .setAuthorization(authorization)
|
Field |
Description |
|---|---|
|
CARD_PAYMENT |
Card Payment |
|
PRE_AUTH |
Card PreAuth |
|
REGISTER_CARD |
Register Card |
|
CREATE_CARD_TOKEN |
Save Card |
|
CHECK_CARD |
Check Card |
|
PaymentWidgetType.PAYMENT_METHODS |
Payment Method Selection |
|
PaymentWidgetType.PRE_AUTH_PAYMENT_METHODS |
PreAuth Method Selection |
|
PaymentWidgetType.GOOGLE_PAY |
Google Pay (Payment) |
|
PaymentWidgetType.PRE_AUTH_GOOGLE_PAY |
Google Pay (PreAuth) |
|
SERVER_SERVER_PAYMENT_METHODS |
Server to Server |
|
PAY_BY_BANK_APP |
PayByBankApp |
The Judo object is now configured and you are ready to make a transaction.
Making a Transaction
Each transaction operation is represented as an Activity.
To make a transaction:
-
Create an Intent to pass the JudoActivity class
-
Add the Judo object to the Intent:
-
Call putExtra
-
Assign it to the JUDO_OPTIONS key
The Judo object holds all the payment configurations previously set up.
-
Pass the Intent and a request code to allow Judopay to handle the onActivityResult and the transaction response:
val intent = Intent(this, JudoActivity::class.java);
intent.putExtra(Judo.JUDO_OPTIONS, judo);
startActivityForResult(intent, PAYMENT_REQUEST_CODE);
-
Implement the onActivityResult method and handle the transaction response:
override fun onActivityResult(requestCode: Int, resultCode: Int, data: Intent?) {
    super.onActivityResult(requestCode, resultCode, data)

    if (requestCode == PAYMENT_REQUEST_CODE) {
        when (resultCode) {

            PAYMENT_CANCELLED -> toast("User cancelled the payment.")

            PAYMENT_SUCCESS -> {
                val receipt = data?.getParcelableExtra<Receipt>(JUDO_RECEIPT)
                // Handle response
            }

            PAYMENT_ERROR -> {
                val error = data?.getParcelableExtra<JudoError>(JUDO_ERROR)
                // Handle error
            }
        }
    }
}
Check the request code from the onActivityResult and see if it matches with the PAYMENT_REQUEST_CODE. If it does, the result is called from the JudoActivity.
This means the imported response codes can be used to check the following possible response type and handle each case respectively:
-
success
-
cancel
-
error
Android Server to Server Transactions
To set a server-to-server transaction:
-
On the Judo builder set the PaymentWidgetType to:
val judo = Judo.Builder(PaymentWidgetType.SERVER_TO_SERVER_PAYMENT_METHODS)
     .setApiToken("my-token")
     .setApiSecret("my-secret")
     .setIsSandboxed(true)
     .setJudoId("my-judo-id")
     .setAmount(amount)
     .setReference(reference)
            .build()
Token Payments
If you are building your own card wallet, and not using a UI you can make a preauth or payment using a stored card token.
Steps:
-
Use the TokenPayment or TokenPreAuth endpoints
-
Create a function
-
Create the Card Token and Secret
-
Send a Json Request
-
Handle the Response
Billing Address | primary account details | CV2 are
optionalfields.
yourConsumerReference | yourPaymentReference | amount | currency | judo ID are
mandatoryfields.
To make a token payment or preauth token payment:
-
Create the api service via JudoApiServiceFactory:
val service = JudoApiServiceFactory.createApiService(this, judo)
-
Call the tokenPayment or preAuthTokenPayment
This is a TokenRequest object that requires the card token and optional security code:
service.tokenPayment(judo.toTokenRequest(cardToken, "452"))service.preAuthTokenPayment(judo.toTokenRequest(cardToken, "452")) -
Handle the callback:
// Make a token payment API call via JudoApiService
service.tokenPayment(getJudo(judo).toTokenPayment(cardToken, "452"))
    .enqueue(object: Callback<JudoApiCallResult<Receipt>> {
        // Handle failure response
        override fun onFailure(call: Call<JudoApiCallResult<Receipt>>, t: Throwable) {
            TODO("Not yet implemented")
        }
        // Handle successful response
        override fun onResponse(
            call: Call<JudoApiCallResult<Receipt>>,
            response: Response<JudoApiCallResult<Receipt>>
        ) {
            when (val apiResult = response.body()) {
                is JudoApiCallResult.Success -> {
                    val receipt = apiResult.data
                    // Check if 3DS authentication is required
                    if (receipt != null && receipt.is3dSecureRequired) {
                        // Callback that handles 3DS response from SDK
                        val callback = object : ThreeDSOneCompletionCallback {
                            // Handle 3DS successful authentication
                            override fun onSuccess(success: JudoPaymentResult) {
                                setResult(success.code, success.toIntent())
                                finish()
                            }
                            // Handle 3DS unsuccessful authentication
                            override fun onFailure(error: JudoPaymentResult) {
                                setResult(error.code, error.toIntent())
                                finish()
                            }
                        }
                        // Fragment that handles 3DS webview logic
                        val fragment = ThreeDSOneCardVerificationDialogFragment(
                            service,
                            receipt.toCardVerificationModel(),
                            callback
                        )
                        fragment.show(
                            supportFragmentManager,
                            THREE_DS_ONE_DIALOG_FRAGMENT_TAG
                        )
                    } else {
                        // If 3DS authentication not required, handle the result
                        val result = apiResult.toJudoPaymentResult(resources)
                        setResult(result.code, result.toIntent())
                        finish()
                    }
                }
                is JudoApiCallResult.Failure -> {
                    val result = apiResult.toJudoPaymentResult(resources)
                    setResult(result.code, result.toIntent())
                    finish()
                }
            }
        }
    })
3D Secure 2 for Android
Judokit Android 3D Secure 2 is in BETA. Please contact developer support for this version of the SDK.
You can use the latest SDK for 3D Secure 1.
Mobile Android SDK is enabled for both 3D Secure 1 and 3D Secure 2 (EMV 3DS).
Using the Card Entry UI
The easiest way to integrate 3D Secure is to use the UI within Judokit, as this handles the 3D Secure flow for you.
Using a 3D Secure Enabled credential*, follow the steps for Making a Transaction
For 3D Secure 2 transactions: billingAddress and emailAddress are mandatory fields.
You can provide billingAddress and emailAddress in two ways:
-
Add and populate billingAddress and emailAddress to the payment configuration object:
val judo = Judo.Builder(PaymentWidgetType.CARD_PAYMENT)
            //...
            // sets whether 3DS 2.0 UI request billing information should be enabled or disabled
            .set3DS2Enabled(true)

            // sets the value for challenge request indicator,
            // possible values:
            // ChallengeRequestIndicator.NO_PREFERENCE
            // ChallengeRequestIndicator.NO_CHALLENGE
            // ChallengeRequestIndicator.CHALLENGE_PREFERRED
            // ChallengeRequestIndicator.CHALLENGE_AS_MANDATE
            .setChallengeRequestIndicator(ChallengeRequestIndicator.NO_PREFERENCE)

            // sets the value for SCA exemption,
            // possible values:
            // ScaExemption.LOW_VALUE
            // ScaExemption.SECURE_CORPORATE
            // ScaExemption.TRUSTED_BENEFICIARY
            // ScaExemption.TRANSACTION_RISK_ANALYSIS
            .setScaExemption(ScaExemption.LOW_VALUE)

            // email address
            .setEmailAddress("email@me.com")

            // sets the maximum timeout for 3DS 2.0 transactions in minutes
            .setThreeDSTwoMaxTimeout(30)

            // sets phone number country code
            .setPhoneCountryCode("44")

            // phone number
            .setMobileNumber("11223344556677")

            // ...
            .build()
-
Or, to request this information from your customer, enable the billingAddress and emailAddress fields to appear in the UI:
-
In the code snippet: set3DS2Enabled = true
-
Using Token Payments
Using a 3D Secure Enabled credential*, follow the steps for making Token Payments.
*Make sure your account has 3D Secure enabled. Contact Customer Support to set this up.
Customising your Integration
You can customise the payment experience for the consumer by configuring the following UI behaviour properties in the UiConfiguration object:
UI Configuration
You have flexibility on how the payment experience looks to the consumer.
The UiConfiguration object allows you to:
-
Enable | disable the Address Verification Service
-
Show | hide the amount in the Payments Widget
-
Enable | disable consumers entering the CV2 code
-
Show | hide the amount in the payment button
import com.judopay.judokit.android.UIConfiguration

val uiConfiguration = UIConfiguration.Builder()
           .setAvsEnabled(true)
           .setShouldPaymentMethodsDisplayAmount(true)
           .setShouldPaymentMethodsVerifySecurityCode(true)
           .setShouldPaymentButtonDisplayAmount(true)
.build()-
Call setUIConfiguration on the Judo builder
-
Pass the uiConfigurationobject:
val judo = Judo.Builder(PaymentWidgetType.PAYMENT_METHODS)
    ...
        .setUIConfiguration(uiConfiguration)
        .build()
To set the primary account details when using an alternative payment method, see Adding Payment Methods.
Primary Account Details
You can also set the primary account details to be sent with the transaction.
To set the primary account details:
-
Call the setPrimaryAccountDetails on the Judo builder:
val primaryAccountDetails = PrimaryAccountDetails.Builder()
                              .setName("example-name")
                              .setAccountNumber("example-account-number")
                              .setDataOfBirth("example-date")
                              .setPostCode("example-postcode")
                              .build()

val judo = Judo.Builder(PaymentWidgetType.CARD_PAYMENT)
            ...
            .setPrimaryAccountDetails(primaryAccountDetails)
            .build()
Supported Card Networks
You can select the card networks you want to support.
To select the supported card networks:
-
Set the setSupportedCardNetworks on the Judo builder with an array of CardNetwork values.
For the purpose of this exercise, Visa and MasterCard are selected as the supported card networks:
val networks = arrayOf(CardNetwork.VISA, CardNetwork.MASTERCARD)

val judo = Judo.Builder(PaymentWidgetType.CARD_PAYMENT)
            ...
            .setSupportedCardNetworks(networks)
            .build()
Card Network Options:
|
Card Network Name |
Value |
|---|---|
|
Visa |
VISA |
|
MasterCard |
MASTERCARD |
|
AMEX |
AMEX |
|
China Union Pay |
CHINA_UNION_PAY |
|
JCB |
JCB |
|
Diners Club International |
DINERS_CLUB |
|
Discover |
DISCOVER |
|
Other |
OTHER |
Default Payment Methods
By default, all payment methods are displayed in the Payments Widget (as long as the required parameters are set).
However, you can select the payment methods you want to support.
To select the supported payment methods:
-
Call the setPaymentMethods on the Judo builder
-
Pass an array of PaymentMethod enum values:
val paymentMethods = arrayOf(
  PaymentMethod.CARD,
  PaymentMethod.GOOGLE_PAY,
  PaymentMethod.IDEAL
)

val judo = Judo.Builder(PaymentWidgetType.CARD_PAYMENT)
            ...
            .setPaymentMethods(paymentMethods)
            .build()
The order you add the payment methods into the array, is the order they will be displayed on screen.
Scan Card Button
You can add the SCAN CARD button when the consumer selects Pay with Card.
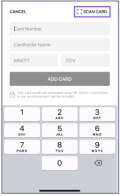
To add the Scan Card library:
-
Navigate to your build.gradle file
-
In the dependencies section add:
'cards.pay:paycardsrecognizer:1.1.0'
android {
    ...
}

dependencies {
    ...
    implementation 'cards.pay:paycardsrecognizer:1.1.0'
    ...
}
Payments Widget
To set up the Payments Widget for Android:
-
Change the PaymentWidgetType to either:
-
PAYMENT_METHODS or,
-
PRE_AUTH_PAYMENT_METHODS
val judo = Judo.Builder(PaymentWidgetType.PAYMENT_METHODS)
            .setApiToken("my-token")
            .setApiSecret("my-secret")
            .setIsSandboxed(true)
            .setJudoId("my-judo-id")
            .setAmount(amount)
            .setReference(reference)
            .setGooglePayConfiguration(googlePayConfiguration)
.build()-
Start the Judo Activity:
val intent = Intent(this, JudoActivity::class.java);
intent.putExtra(Judo.JUDO_OPTIONS, judo);
startActivityForResult(intent, PAYMENT_REQUEST_CODE);
Styling
You have the flexibility of creating your own styling and colour values:
-
Override the styles.xml properties
-
to provide your own styling
-
-
Override the colors.xml properties
-
to provide your own colour values
-
For a more detailed explanation on:
-
Styles and Themes: See the Android Developer Guide.
-
Brand Guidelines: See the Google Pay™ Brand Guidelines.
Adding Payment Methods
Configuring Google Pay™ for Android
Prerequisites
-
You have set up your Google Pay™ payments profile.
-
For more details, see Create a Payments Profile..
-
-
You have imported the following models:
import com.judopay.model.googlepay.GooglePayAddressFormat
import com.judopay.model.googlepay.GooglePayBillingAddressParameters
import com.judopay.model.GooglePayConfiguration
import com.judopay.model.googlepay.GooglePayEnvironment
import com.judopay.model.googlepay.GooglePayShippingAddressParameters
Creating the Google Pay™ Configuration
To create the Google Pay™ configuration:
-
Set the required properties using the prerequisite imported models.
-
Set some additional optional properties to customise Google Pay™:
var billingAddressParams = GooglePayBillingAddressParameters(
    format = GooglePayAddressFormat.MIN,
    phoneNumberRequired = true
    )

var shippingAddressParams = GooglePayShippingAddressParameters(
    phoneNumberRequired = true
    )
var googlePayConfiguration = GooglePayConfiguration.Builder()
    .setTransactionCountryCode("GB")
    .setEnvironment(GooglePayEnvironment.TEST)
    .setIsEmailRequired(true)
    .setIsBillingAddressRequired(true)
    .setBillingAddressParameters(billingAddressParams)
    .setIsShippingAddressRequired(true)
    .setShippingAddressParameters(shippingAddressParams)
.build()
|
Field |
Description |
|---|---|
setTransactionCountryCode
Required |
Sets the transaction ISO-3166 country code. |
setEnvironment
Required |
Sets the Google Pay™ environment to either:
In order to go-live you will need to have set up your Google Pay™ API merchant live account. |
setIsEmailRequired
Required |
Sets the option for the consumer to provide their email address. |
setBillingAddressParameters
Required |
Sets the option for the consumer to provide their billing information. |
setBillingAddressParameters
Optional |
Sets the billing address format. |
SetIsShippingAddressRequired
Required |
Sets the option for the consumer to provide their shipping information. |
setShippingAddressParameters
Optional |
Sets the shipping address format. |
Although setting the billing and shipping parameters is optional, they must be provided if the billing and shipping requirements are set to true.
Making a Google Pay™ Transaction
Prerequisite
You have set up the GooglePayConfiguration.
To make a Google Pay™ transaction:
-
Add the setGooglePayConfiguration method to the Judo builder
-
Set the PaymentWidgetType to:
-
GOOGLE_PAY or
-
PRE_AUTH_GOOGLE_PAY
-
-
Start the Judo activity:
val judo = Judo.Builder(PaymentWidgetType.GOOGLE_PAY)
    ...
    .setGooglePayConfiguration(googlePayConfiguration)
    .build()

val intent = Intent(this, JudoActivity::class.java);
intent.putExtra(Judo.JUDO_OPTIONS, judo);
startActivityForResult(intent, PAYMENT_REQUEST_CODE);To add the PayByBankApp button
-
Insert the button in the layout file:
<com.judopay.judokit.android.ui.common.PayByBankButton
android:id="@+id/payByBankButton"
android:layout_width="wrap_content"
android:layout_height="wrap_content" />-
Set OnClickListener to the PayByBankApp button
The JudoActivity will start and pass the result to merchant:
payByBankButton.setOnClickListener {
    val intent = Intent(this, JudoActivity::class.java)
    intent.putExtra(JUDO_OPTIONS, judo)
    startActivityForResult(intent, JUDO_PAYMENT_WIDGET_REQUEST_CODE)
}-
Enable the PayByBankApp in the Payment Selector Screen:
-
Build the Judo configuration object:
-
Set the payment widget type to:
-
PaymentWidgetType.PAYMENT_METHODSGBP
-
-
Set the currency:
-
GBP
-
-
-
val amount = Amount.Builder()
            .setAmount("1")
            .setCurrency(Currency.GBP)
            .build()

Judo.Builder(PaymentWidgetType.PAYMENT_METHODS)
            .setJudoId(judoId)
            .setApiToken(token)
            .setApiSecret(secret)
            .setAmount(amount)
            .setReference(reference)
            .setIsSandboxed(isSandboxed)
            .setSupportedCardNetworks(networks)
            .setPaymentMethods(paymentMethods)
            .setUiConfiguration(uiConfiguration)
            .setGooglePayConfiguration(googlePayConfiguration)
            .setPBBAConfiguration(pbbaConfiguration)
.build()-
Start JudoActivity with the JudoConfiguration object:
val intent = Intent(this, JudoActivity::class.java)
    intent.putExtra(JUDO_OPTIONS, judo)
    startActivityForResult(intent, JUDO_PAYMENT_WIDGET_REQUEST_CODE)
For the PayByBankApp button to appear in the Payments Widget, a banking app must already be installed.
The PayByBankApp Button is displayed:
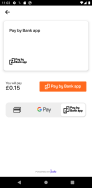
To display the PayByBankApp as a Payment Method for Android:

-
Add the intent-filter to the AndroidManifest.xml file.
This registers the deep link URL:
<activity
  android:name=".MainActivity"
  android:launchMode="singleTask">
  <intent-filter>
    <action android:name="android.intent.action.VIEW" />

    <category android:name="android.intent.category.DEFAULT" />
    <category android:name="android.intent.category.BROWSABLE" />

        <data
           android:scheme="your"
           android:host="scheme" />
  </intent-filter>
</activity>-
Create the Judo object:
-
Set PaymentWidgetType to:
-
PAY_BY_BANK_APP, or
-
PAYMENT_METHODS
If using the payments widget.
-
-
Set currency:
-
GBP
-
-
-
Create the PBBAConfiguration object:
-
Set deepLinkScheme to the defined scheme in the AndroidManifest.xml file:
-
 val pbbaConfiguration = PBBAConfiguration.Builder()
        .setDeepLinkScheme("your://scheme")
        .build()
Judo.Builder(PaymentWidgetType.PAY_BY_BANK_APP)
            .setJudoId(judoId)
            .setApiToken(token)
            .setApiSecret(secret)
            .setAmount(amount)
            .setReference(reference)
            .setIsSandboxed(isSandboxed)
            .setSupportedCardNetworks(networks)
            .setPaymentMethods(paymentMethods)
            .setUiConfiguration(uiConfiguration)
            .setGooglePayConfiguration(googlePayConfiguration)
            .setPBBAConfiguration(pbbaConfiguration)
.build()-
Override the onNewIntent method to catch the deeplink URL
-
Add the deepLinkURL to the PBBAConfiguration object
-
Start JudoActivity with the desired payment widget type
-
Add the same logic in onCreate
-
 override fun onNewIntent(intent: Intent?) {
        checkForDeepLink(intent)
        super.onNewIntent(intent)
    }

    override fun onCreate(savedInstanceState: Bundle?) {
        super.onCreate(savedInstanceState)
        ...
        checkForDeepLink()
        ...
    }

    private fun checkForDeepLink(intent: Intent? = this.intent) {
        val uri = intent?.data
        val newIntent = Intent(this, JudoActivity::class.java)
        if (uri.contains("your://scheme")) {
            val newPbbaConfig = pbbaConfiguration.newBuilder()
                .setDeepLinkURL(uri)
                .build()
            val judo = getJudo(PaymentWidgetType.PAY_BY_BANK_APP).newBuilder()
                .setPBBAConfiguration(newPbbaConfig)
                .build()
            newIntent.putExtra(JUDO_OPTIONS, judo)
            startActivityForResult(newIntent, JUDO_PAYMENT_WIDGET_REQUEST_CODE)
        }
    }

    private fun getJudo(widgetType: PaymentWidgetType): Judo {
        return Judo.Builder(widgetType)
            .setJudoId(judoId)
            .setApiToken(token)
            .setApiSecret(secret)
            .setAmount(amount)
            .setReference(reference)
            .setIsSandboxed(isSandboxed)
            .setSupportedCardNetworks(networks)
            .setPaymentMethods(paymentMethods)
            .setUiConfiguration(uiConfiguration)
            .setGooglePayConfiguration(googlePayConfiguration)
            .setPBBAConfiguration(pbbaConfiguration)
.build()-
To catch the first response, create a broadcastReceiver:
private val broadcastReceiver = object : BroadcastReceiver() {
    override fun onReceive(context: Context?, intent: Intent?) {
    val result = intent?.getParcelableExtra<JudoResult>(PBBA_RESULT)
        // Handle result
    }
}-
Register the defined receiver in onCreate:
LocalBroadcastManager.getInstance(this).registerReceiver(
    orderIdReceiver,
    IntentFilter(BR_PBBA_RESULT)
)-
Catch the result in the onActivityResult method:
override fun onActivityResult(requestCode: Int, resultCode: Int, data: Intent?) {
   super.onActivityResult(requestCode, resultCode, data)

     if (requestCode == JUDO_PAYMENT_WIDGET_REQUEST_CODE) {
       when (resultCode) {
         PAYMENT_SUCCESS -> {
         val result = data?.getParcelableExtra<JudoResult>(JUDO_RESULT)
             //Process successful payment
              }
         PAYMENT_CANCELLED -> {
         val result = data?.getParcelableExtra<JudoResult>(JUDO_RESULT)
            //Process cancelled payment
              }
         PAYMENT_ERROR -> {
         val error = data?.getParcelableExtra<JudoError>(JUDO_ERROR)
            //Process unsuccessful payment
              }
          }
      }
}
Not using the Mobile SDK Payments Widget?
To Integrate directly to your app:
-
Insert the button in the layout file:
<com.judokit.android.ui.common.PayByBankButton
  android:id="@+id/payByBankButton"
  android:layout_width="wrap_content"
  android:layout_height="wrap_content"
/>-
Add intent-filter to the AndroidManifest.xml file.
This will register the deep link URL:
activity
 android:name=".MainActivity"
 android:launchMode="singleTask">
 <intent-filter>
 <action android:name="android.intent.action.VIEW" />

 <category android:name="android.intent.category.DEFAULT" />
 <category android:name="android.intent.category.BROWSABLE" />

 <data
   android:scheme="your"
   android:host="scheme" />
 </intent-filter>
</activity>-
Create the Judo object:
-
Set the PaymentWidgetType to PAY_BY_BANK_APP
-
Create the PBBAConfiguration object
-
Set deepLinkScheme to the defined scheme in the AndroidManifest.xml file:
-
 val pbbaConfiguration = PBBAConfiguration.Builder()
        .setDeepLinkScheme("your://scheme")
        .build()
Judo.Builder(PaymentWidgetType.PAY_BY_BANK_APP)
            .setJudoId(judoId)
            .setApiToken(token)
            .setApiSecret(secret)
            .setAmount(amount)
            .setReference(reference)
            .setIsSandboxed(isSandboxed)
            .setSupportedCardNetworks(networks)
            .setPaymentMethods(paymentMethods)
            .setUiConfiguration(uiConfiguration)
            .setGooglePayConfiguration(googlePayConfiguration)
            .setPBBAConfiguration(pbbaConfiguration)
.build()-
Override the onNewIntent method to catch the deeplink URL:
-
Add the deepLinkURL to the PBBAConfiguration object
-
Start JudoActivity with the desired payment widget type
-
Add the same logic in onCreate
-
 override fun onNewIntent(intent: Intent?) {
        checkForDeepLink(intent)
        super.onNewIntent(intent)
    }

    override fun onCreate(savedInstanceState: Bundle?) {
        super.onCreate(savedInstanceState)
        ...
        checkForDeepLink()
        ...
    }

    private fun checkForDeepLink(intent: Intent? = this.intent) {
        val uri = intent?.data
        val newIntent = Intent(this, JudoActivity::class.java)
        if (uri.contains("your://scheme")) {
            val newPbbaConfig = pbbaConfiguration.newBuilder()
                .setDeepLinkURL(uri)
                .build()
            val judo = getJudo(PaymentWidgetType.PAY_BY_BANK_APP).newBuilder()
                .setPBBAConfiguration(newPbbaConfig)
                .build()
            newIntent.putExtra(JUDO_OPTIONS, judo)
            startActivityForResult(newIntent, JUDO_PAYMENT_WIDGET_REQUEST_CODE)
        }
    }

    private fun getJudo(widgetType: PaymentWidgetType): Judo {
        return Judo.Builder(widgetType)
            .setJudoId(judoId)
            .setApiToken(token)
            .setApiSecret(secret)
            .setAmount(amount)
            .setReference(reference)
            .setIsSandboxed(isSandboxed)
            .setSupportedCardNetworks(networks)
            .setPaymentMethods(paymentMethods)
            .setUiConfiguration(uiConfiguration)
            .setGooglePayConfiguration(googlePayConfiguration)
            .setPBBAConfiguration(pbbaConfiguration)
.build()-
To catch the first response, create a broadcastReceiver:
private val broadcastReceiver = object : BroadcastReceiver() {
    override fun onReceive(context: Context?, intent: Intent?) {
    val result = intent?.getParcelableExtra<JudoResult>(PBBA_RESULT)
        // Handle result
    }
}-
Register the defined receiver in onCreate:
LocalBroadcastManager.getInstance(this).registerReceiver(
    orderIdReceiver,
    IntentFilter(BR_PBBA_RESULT)
)-
Set OnClickListener to the previously defined PayByBankApp button
JudoActivity will start and pass the result to merchant:
payByBankButton.setOnClickListener {
  val intent = Intent(this, JudoActivity::class.java)
  intent.putExtra(JUDO_OPTIONS, judo)
  startActivityForResult(intent, JUDO_PAYMENT_WIDGET_REQUEST_CODE)
}-
Catch the result in the onActivityResult method:
override fun onActivityResult(requestCode: Int, resultCode: Int, data: Intent?) {
  super.onActivityResult(requestCode, resultCode, data)

    if (requestCode == JUDO_PAYMENT_WIDGET_REQUEST_CODE) {
       when (resultCode) {
       PAYMENT_SUCCESS -> {
       val result = data?.getParcelableExtra<JudoResult>(JUDO_RESULT)
           //Process successful payment
             }
       PAYMENT_CANCELLED -> {
       val result = data?.getParcelableExtra<JudoResult>(JUDO_RESULT)
           //Process cancelled payment
             }
       PAYMENT_ERROR -> {
       val error = data?.getParcelableExtra<JudoError>(JUDO_ERROR)
           //Process unsuccessful payment
                }
            }
        }
    }
Displaying iDEAL as a Payment Method for Android
To add iDEAL support to your Payments Widget, set:
-
The currency code to EUR (Euro)
-
The JudoId
The
judoIdparameter can be set by calling
setJudoIdon the Judo builder.
val judo = Judo.Builder(PaymentWidgetType.PAYMENT_METHODS)
       ...
    .setJudoId("my-judo-id")
    .setCurrency("EUR")
    .build()
Once the currency and judoId are set, iDEAL will be available as a payment method in the Payments Widget.
Testing Android Mobile Transactions
To test Android transactions in the sandbox environment:
-
Add the sandbox token and secret to your app’s main Activity class
-
Ensure the SDK is configured for the sandbox environment
-
Use the Test Cards provided.
Ensure you are using a consumerReference for each request.
Enable Google Pay™ on your Mobile App
You will need to have your app approved by Google prior to using Google Pay™ in production.
-
Ensure you have tested Google Pay™ on your mobile app in the sandbox environment.
-
Ensure your Android Application Package is enabled for sandbox testing.
This is to permit the Google Pay™ Support Team to run their review tests.
-
Send your Android Application Package to the Google Pay™ Support Team so they can review your app and assist you with any of the Terms and Conditions that need to be agreed.
-
The Google Pay™ Support Team will enable your app with production access to Google Pay™, once their review has been successfully completed.
You will then be able to accept Google Pay™ transactions from your mobile app.