iOS
Integrating with Judopay
PreRequisites
-
You have set up your Judopay account.
-
You have the latest version of the iOS SDK.
For Mobile apps, it is recommended not to make a transaction from the app, as the Token and Secret could become compromised. Use the server to make the transaction.
Create a Register Card app and enable the Register Card Transactions permission.
Integrating via CocoaPods
Step One - To integrate the iOS mobile SDK via CocoaPods:
-
Install CocoaPods with the following command:
gem install cocoapods -
Via the terminal, navigate to your project's root directory
-
Initialize CocoaPods with the following command:
pod init -
A podfile is generated in the root directory
Step Two - To add the mobile SDK as a dependency:
-
Open the podfile and add the following:
pod 'JudoKit-iOS' -
Install the dependency with the following command:
pod install
The Pod installation complete! message appears in the terminal.
If the Unable to find a specification error message appears, your CocoaPods repository, which stores a reference to all available pods, needs updating.
To update your CocoaPods repository run: $ pod repo update
Ensure you always use the generated .xcworkspace file instead of the .xcodeproj file.
See Judopay's JudoKit for iOS on Github.
Integrating via Carthage
To integrate the iOS Mobile SDK via Carthage:
-
Install Carthage on your machine:
-
Using brew (terminal): brew install carthage
-
-
In the root folder of your project, add a new file named Cartfile
-
In Cartfile, add all the dependencies you need:
For the purpose of this exercise: github "Judopay/JudoKit-iOS"
-
In the terminal run the following command:
carthage update --platform iOS -
Check your root folder has the following:
-
Cartfile.resolved (File with all downloaded dependencies, including their versions)
-
Carthage folder
-
In Xcode, manually drag and drop the JudoKit-iOS framework and all the dependent frameworks into:
-
Linked Frameworks
-
Libraries section
Frameworks are stored in folder Carthage > Checkouts > Carthage/Builds
-
Rebuild the project
-
Import the JudoKit-iOS into your project files:
#import <JudoKit-iOS/JudoKit_iOS.h>
The iOS Mobile SDK is now ready to use in your iOS project.
Initialising a JudoKit Session
To get started:
-
To access the JudoKit class, import the JudoKitObjC framework:
#import <JudoKitObjC/JudoKitObjC.h>
To initialise a JudoKit session:
-
Use either a basic (token:secret) authentication method, or a session (token & session) authentication method:
The difference between a basic authentication method and a session authentication method is:
Basic authentications last indefinitely.
Session authentications are valid for one transaction. This offers a more secure authentication approach.
-
Create a basic authentication instance:
JPBasicAuthorization *authorization = [JPBasicAuthorization authorizationWithToken:
-
Create a payment session authentication instance:
JPSessionAuthorization *authorization = [JPSessionAuthorization authorizationWithToken:
To create a JudoKit session:
JudoKit *judo = [[JudoKit alloc] initWithAuthorization:authorization];
To communicate with the sandbox environment, enter: judo.isSandboxed = YES;
By default, Judopay allows jailbroken devices to access it's features. If you would like to restrict access to non-jailbroken devices only, use this initializer instead:
JudoKit *judo = [[JudoKit alloc]initWithToken:"my-token" secret:"my-secret"allowJailbrokenDevices:NO];
Setting the Parameters for a Successful Transaction
Use the JPConfiguration object to set the parameters. The JPConfiguration object is passed as a method parameter and communicates how the payment flow should behave.
To configure the JPConfiguration object, add your:
-
JudoId
JudoId format = 100100100
-
Amount
-
ConsumerReference
JPAmount *myAmount;
JPReference *myReference;
JPConfiguration *myConfiguration;

    myAmount = [[JPAmount alloc] initWithAmount:@"0.01"
                                   currency:@"GBP"];

    myReference = [[JPReference alloc] initWithConsumerReference:@"my-reference"];

    myConfiguration = [JPConfiguration alloc] initWithJudoID:@"my-judo-id"
                      amount:myAmount
                      reference:myReference];
The JPAmount object sets your:
-
Transaction amount
-
Currency code
-
JPReference
These are used to set your unique consumerReference, to identify your consumer.
Now you can use this object to make a transaction.
Making a Transaction
Prerequisites:
-
You have integrated with the Mobile SDK
-
You have setup the JPConfiguration instance with all the required properties
Card validation | Card formatting | Type | Detection | is handled by Judopay.
The available transaction types that can be passed as a parameter are:
-
Payment
-
PreAuth
-
Register Card
-
Save Card
-
Check Card
For more details, see our Transaction API Reference documentation.
Once you have completed the prerequisite steps, you are ready to make a transaction.
To make a transaction:
-
Call the method and handling the response from the completion block:
[judo invokeTransactionWithType:TransactionTypePayment
                  configuration:configuration
                     completion:^(JPResponse *response, NSError *error) {

     // Handle response / error

}];
|
Name |
Type |
Description |
|---|---|---|
|
|
TransactionType |
An enum value that sets the transaction type. |
|
|
JPConfiguration |
An object that configures the payment flow. |
|
|
JPResponse NSError |
A completion block that returns the transaction response or an error. |
iOS Server to Server Transactions
The SDK also offers server-to-server capabilities. This works by sending the payment token back to the merchant the moment the consumer presses the Pay button.
This allows the merchant to process and complete the transaction on their side.
Server-to-server capabilities are available for both transactions made through:
-
The Payments Widget
-
Apple Pay™
To specify a server-to-server transaction:
-
Set the TransactionMode to TransactionModeServerToServer when calling the Judopay methods:
[self.judoKitSession invokePaymentMethodScreenWithMode:TransactionModeServerToServer
                configuration:configuration
                completion:^(JPResponse *response, NSError *error) {
    // Handle the payment token returned from the response
}];
-
Specify an Apple Pay™ transaction:
[self.judoKitSession invokeApplePayWithMode:TransactionModeServerToServer
            configuration:configuration
            completion:^(JPResponse *response, NSError *error) {
    // Handle the payment token returned from the response
}];
Token Payments and Preauths
If you are building your own card wallet, and not using a UI you can make a /payments or /preauths transaction using a stored card token.
Steps:
-
Create the Card Token
-
Create an API Service Session
-
Create a Token Transaction Request
-
Make a transaction using the
/paymentsor/preauthsendpoint -
Handle the Response
Billing Address | primary account details | CV2 are
optionalfields.
yourConsumerReference | yourPaymentReference | amount | currency | judo ID are
mandatoryfields.
3D Secure for iOS
JudoKit-iOS is enabled for 3D Secure 1. (3D Secure 2 is coming soon).
Using the Card Entry UI
The easiest way to integrate 3D Secure is to use the UI within JudoKit, as this handles the 3D Secure flow for you.
Using a 3D Secure Enabled credential*, follow the steps for Making a Transaction.
Using Token Payments
Using a 3D Secure Enabled credential*, follow the steps for making Token Payments and Preauths.
*Make sure your account has 3D Secure enabled. Contact Customer Support to set this up.
Customising your Integration
UI Configuration
You have flexibility on how the payment experience looks to the consumer.
The JPConfiguration object has a uiConfiguration property of type JPUIConfiguration.
This allows you to:
-
Enable | disable the Address Verification Service
-
Show | hide the amount in the Payments Widget
-
Show | hide the amount in the payment button
-
Enable | disable consumers entering the CV2 code
-
You can also override some of the default iOS theming options.
An example of the JPUIConfiguration object:
JPUIConfiguration *uiConfig = [JPUIConfiguration new];
    uiConfig.shouldPaymentMethodsDisplayAmount = NO;
    uiConfig.shouldPaymentButtonDisplayAmount: = NO;
    uiConfig.isAVSEnabled = YES;
    uiConfig.shouldPaymentMethodsVerifySecurityCode = YES;

configuration.uiConfiguration = uiConfig;
The JPUIConfiguration instance is set as part of the JPConfiguration object that is passed to our transactions.
Primary Account Details
To set the primary account details when using an alternative payment method, see Adding Payment Methods:
To set the primary account details to be sent with the transaction:
-
Set the primaryAccountDetails property of the JPConfiguration object:
JPPrimaryAccountDetails *accountDetails;
accountDetails = [JPPrimaryAccountDetails new];

    accountDetails.name = @"example-name";
    accountDetails.accountNumber = @"example-number";
    accountDetails.dateOfBirth = @"example-date";
    accountDetails.postCode = @"example-post-code";

configuration.primaryAccountDetails = accountDetails;
Supported Card Networks
To select the card networks to support:
-
Set the supportedCardNetworks property of the JPConfiguration object with one or more values from this list:
|
Card Network Name |
Value |
|---|---|
|
Visa |
CardNetworkVisa |
|
MasterCard |
CardNetworkMasterCard |
|
AMEX |
CardNetworkAMEX |
|
China Union Pay |
CardNetworkChinaUnionPay |
|
JCB |
CardNetworkJCB |
|
Diners Club International |
CardNetworkDinersClub |
|
Discover |
CardNetworkDiscover |
|
All |
CardNetworksAll |
For the purpose of this exercise, Visa and MasterCard are set as the supported card networks: configuration.supportedCardNetworks = CardNetworkVisa | CardNetworkMasterCard;
Card Address
To set the card address when using an alternative payment method, see Adding Payment Methods:
To send additional card address details with the transaction:
-
Set the cardAddress parameter in the JPConfiguration object:
JPAddress *cardAddress = [[JPCardAddress alloc] initWithLine1:@"address-1"
                 line2:@"address-2"
                 line3:nil
                 town:@"example-town"
                 countryCode:@"GB"
                 postCode:@"EX4 MPL3"];
The above properties are optional, so set only the ones you need.
Default Payment Methods
By default, all payment methods are displayed in the Payments Widget (as long as the required parameters are set).
You have the flexibility to include the payment methods you support, with pre-defined initialisers for each payment method.
To set the Payment Methods:
-
Set the paymentMethods property in the JPConfiguration object with your list of payment methods:
configuration.paymentMethods = @[
    JPPaymentMethod.card,
    JPPaymentMethod.iDeal
];
For the purpose of this exercise, Card and iDEAL transactions are set as the supported payment methods.
The JPPaymentMethod is an object that is initialized by providing a JPPaymentMethodType value.
The order in which you add the payment methods in the array is the order in which they will be displayed on screen.
To apply your own custom styles and theme options, override the following payment UI elements:
-
Initialise the theme object:
JPTheme *theme = [JPTheme new];
-
Override the fonts:
theme.largeTitle = [UIFont systemFontOfSize:20.0f];theme.body = [UIFont fontWithName:@"Avenir" size:14.0f];
-
Override the button properties:
theme.buttonColor = UIColor.yellowColor;theme.buttonTitleColor = UIColor.blackColor;theme.buttonCornerRadius = 15.0f;
-
Set a custom back button image:
theme.backButtonImage = [UIImage imageNamed:@"my-custom-icon"];
-
Add the JPTheme instance to the JPUIConfiguration object:
configuration.uiConfiguration.theme = theme;
Payment Reference and Metadata
You can enable some additional information to be sent within a transaction, for example information to help with reconciliation or receipt tracking.
Setting up the paymentReference and metaData properties can allow for:
paymentReference
A unique payment reference for the transaction.
metaData
Any additional details you require, specific to your organisation or internal sytems.
-
Pass the paymentReference within the JPReference object with your transaction:
myReference = [[JPReference alloc] initWithConsumerReference:@"my-reference"
 paymentReference:@"my-payment-reference"];
-
Set the metaData property to send metadata with your transaction:
myReference.metaData = @{
   @"my-key": @"my-value"
}
Adding Payment Methods:
Before you can process Apple Pay™ payments with Judopay, you will need to set up Apple Pay™.
Apple Pay™ is not supported on all Apple devices.
Before invoking any Apple Pay™ functionality within your app, test if it is supported on the device by performing these checks:
-
Use
PKPaymentAuthorizationViewController canMakePayments -
Checks if the device supports Apple Pay™ and has it enabled.
-
Queries both the device hardware and whether Apple Pay™ is enabled in the user’s region.
-
Use
PKPaymentAuthorizationViewController canMakePaymentsUsingNetworks -
A more detailed check to query whether a user has a registered card with particular card schemes.
-
Useful if you do not accept all card types.
Both methods are explained in the Apple developer documentation here.
Getting Your Apple Pay™ Account
System Requirements:
-
A compatible Apple device: iPhone 6 & 6 Plus | iPad Air 2 | iPad mini 3 | or newer
-
OS 8.1 or newer
-
Xcode 6.1 or newer
Create a Merchant ID
We recommend creating a Merchant ID for each Merchant (i.e. business) accepting payments within your app.
To set up your Apple Pay™ account:
|
Step |
Description |
|---|---|
|
|
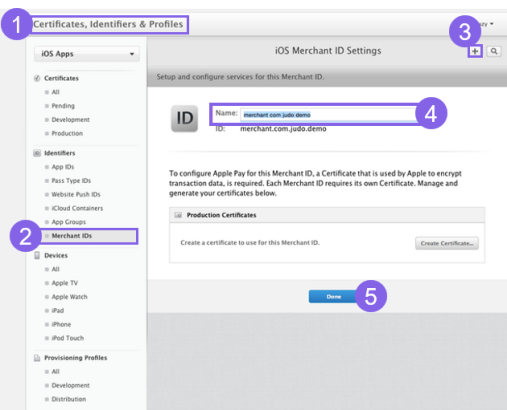
Access your Apple Developer Account. Navigate to Certificates, Identifiers & Profiles. |
|
|
From the side menu, click Merchant IDs. |
|
|
In the iOS Merchant ID Settings screen, click the add button. |
|
|
Set your Merchant ID. The identifier you enter should be a reverse DNS style identifier prefixed with the word. |
|
|
Click Done. |


Create an Apple Pay™ Certificate
Pre-Requisite:
Request a Certificate Signing Request (CSR) file from Judopay.
When you’ve received your CSR, you can create your Apple Pay™ certificate.
To create your Apple Pay™ certificate:
|
Step |
Description |
|---|---|
|
|
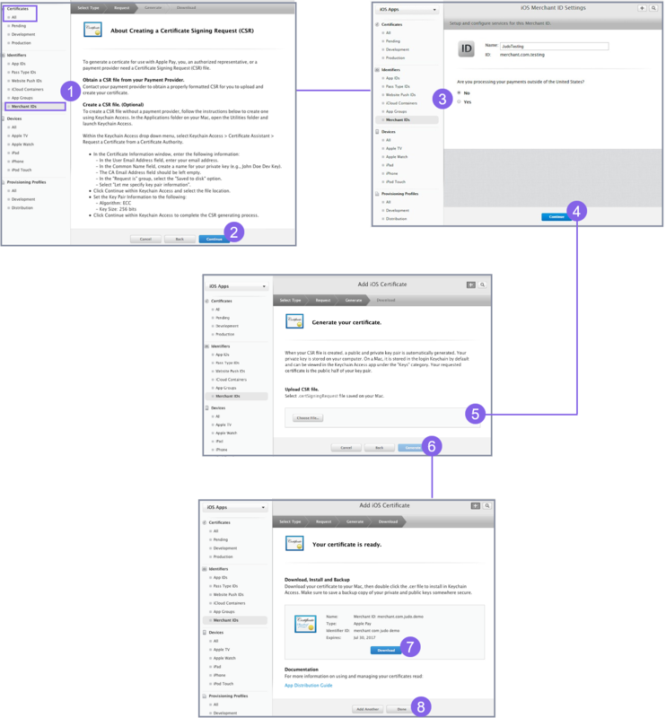
From the side menu, select either:
|
|
|
The screen appears describing how to manually create your Certificate Signing Request (CSR). As you’ve already obtained your CSR from Judopay, click Continue. |
|
|
You will be prompted to state if you are processing transactions outside the United States. Select No. |
|
|
Click Continue. |
|
|
Click Choose File to upload the CSR file provided by Judopay. |
|
|
Click Generate. |
|
|
The confirmation screen appears. Your certificate is ready to download. Click Download. |
|
|
Click Done. To complete your Apple Pay™ set-up send the certificate to Judopay. Once received, we will add the certificate to your account and confirm it has been added. |


Apple Certificates expire just over two years after generation. For example a certificate generated on 13th May 2021 will expire on the 11th June 2022.
To generate a new certificate follow the steps above.
Set Up Apple Pay™ Entitlement
Apple Pay™ is built into the PassKit framework, which means you will need to configure the entitlement.
To set up the entitlement:
|
Step |
Description |
|---|---|
|
|
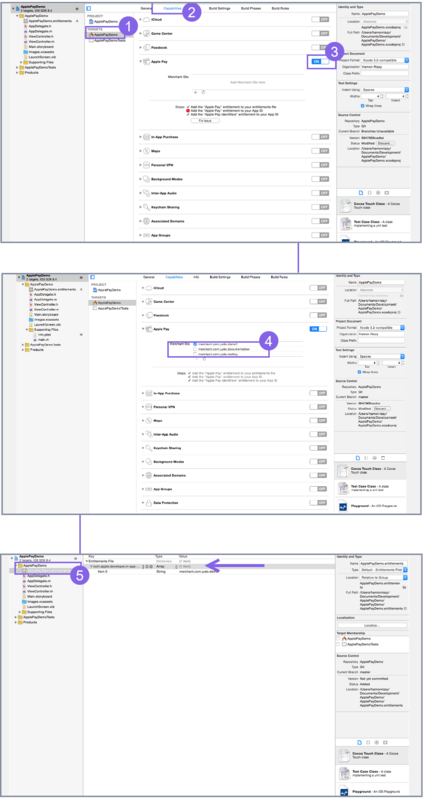
Select your build Target. |
|
|
Select Capabilities. |
|
|
Set the entitlement to Enabled. |
|
|
Add the Merchant ID created earlier to the app. You may need to refresh the list. |
|
|
Open the entitlements file to confirm the Merchant ID has been added to your app. |
Your account is now ready to process Apple Pay™ payments with Judopay.
Configure the iOS Mobile SDK to start making payments.
Apple Pay™ Button
Apple Pay™ allows the consumer to:
-
Bypass the standard checkout flow
-
Complete their payment with speed
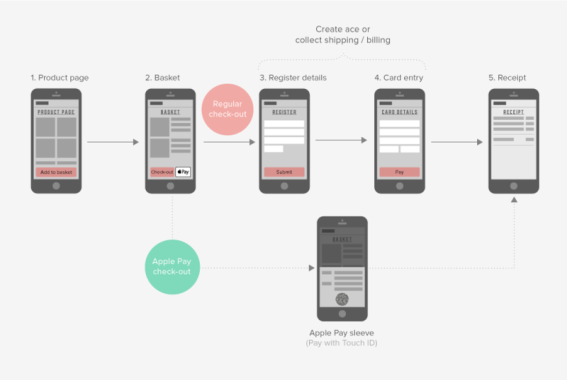
When integrating with Apple Pay™, it is recommended to consider when to introduce the Apple Pay™ button.
This can be:
-
On a single item product listing page
-
Within a basket page with multiple items
-
Both of the above scenarios
The Apple Pay™ button enables consumers to make a purchase from the specific page they are browsing.
By tapping the Apple Pay™ button, the payment sheet is invoked to begin the checkout process.
For more information on the Apple Pay™ button, see Apple’s guidance of the PKPaymentButton Class Reference.
Best Practice Testing
You can test Apple Pay™ in the sandbox environment with the sandbox cards, however please note these test transactions will not work going upstream.
To test Apple Pay™ transactions, point to the live environment and use live cards.
We recommend performing | Pre-Authorizations | Card Payments | Full Refunds: via the Judopay Dashboard > History, or via an API call.
We strongly recommend testing Apple Pay™ through each of these scenarios before you release the app:
-
Unsupported Device
-
Use a non-supported device in order to verify the whole recognition workflow works as expected.
-
-
Card not Supported
-
Use a card issued by a bank that does not support Apple Pay™. You can also use the test cards provided on the Judopay Dashboard to validate the error returned and expected behaviour.
-
-
Payment Cancelled
-
Cancel a transaction in process and see the results in the app and in your Judopay Dashboard history.
-
-
Poor / Loss of Connection
-
While a transaction is being processed, disconnect the internet connection to see if the app responds as expected.
-
Configuring Apple Pay for iOS
To configure Apple Pay™:
-
Add the Apple Pay™ configuration
-
Call the Apple Pay™ method
Step One: Adding the Apple Pay™ Configuration
All Judo transactions require a JPConfiguration instance passed as a method parameter.
The basic JPConfiguration requires:
-
Judo ID
-
Amount
-
Consumer reference
Apple Pay™ transactions require additional parameters in order to work correctly.
-
To set all the Apple Pay™ required parameters, use the JPApplePayConfiguration:
NSDecimalNumber *itemOnePrice = [NSDecimalNumber decimalNumberWithString:@"649.99"];
NSDecimalNumber *itemTwoPrice = [NSDecimalNumber decimalNumberWithString:@"55.00"];
NSDecimalNumber *totalPrice = [NSDecimalNumber decimalNumberWithString:@"704.99"];

NSArray *mySummaryItems = @[
    [JPPaymentSummaryItem itemWithLabel:@"iPhone XR 254GB" amount:itemOnePrice],
    [JPPaymentSummaryItem itemWithLabel:@"iPhone XR Case" amount:itemTwoPrice],
    [JPPaymentSummaryItem itemWithLabel:@"Apple Store" amount:totalPrice],
];
For each item you wish to list, you will need to sum up the item in the basket.
Payment summary items:This is a list of JPPaymentSummaryItem objects, that describe the item being purchased, including the price. In the example above, the item label was set to the merchant from where the item was purchased.
NSArray *mySummaryItems

JPApplePayConfiguration *applePayConfig;
applePayConfig = [[JPApplePayConfiguration alloc] initWithMerchantId:@"my-merchant-id"
        currency:@"GBP"
        countryCode:@"GB"
        paymentSummaryItems:mySummaryItems
];
|
Parameter |
Description |
|---|---|
merchantId NSString |
Your Apple Pay™ merchant ID.This confirms you are able to accept payments. |
currency NSString |
An ISO 4217 currency code. |
countryCode NSString |
An ISO 3166-1 Alpha-2 country code. |
paymentSummaryItems NSArray |
The list of items. |
The last item in the array should always represent the total amount.
Step Two - Add the instance to the object
-
Add the JPApplePayConfiguration instance to the JPConfiguration object:
configuration.applePayConfiguration = applePayConfig; -
Call the Judo method
-
Invoke Apple Pay™ by providing the TransactionMode
This allows you to select
-
Payment or,
-
PreAuth
-
-
Set the Apple Pay™ configuration:
[judo invokeApplePayWithMode:TransactionModePayment
    configuration:myApplePayConfiguration
    completion:^(JPResponse *response, NSError *error) {
    // Handle response or error
}];
Display Apple Pay as a Payment Method for iOS
To display Apple Pay™ as a payment method:
-
Configure the JPApplePayConfiguration object
-
From the JPConfiguration already created, call:
[self.judoKitSession invokePaymentMethodScreenWithMode:TransactionModePayment
        configuration:configuration
        completion:^(JPResponse *response, NSError *error) {
// Handle the response and error
}];
In the example, the TransactionMode is set as the first method parameter.
This is an enum value that allows the selection between Payment and PreAuth transactions.
Adding the Billing and Shipping Details
If you would like the consumer to provide their billing and shipping details, set the following properties:
-
requiredBillingContactFields
-
requiredShippingContactFields
You can choose between multiple contact field types:
-
email address
-
phone number
-
post code
applePayConfig.requiredBillingContactFields = ContactFieldName | ContactFieldEmail;
applePayConfig.requiredShippingContactFields = ContactFieldAll;
|
Parameter |
Description |
|---|---|
ContactFieldName |
Consumer's name. |
ContactFieldEmail |
Consumer's valid email address. |
ContactFieldPhone |
Consumer's valid phone number. |
ContactFieldPostalAddress |
Consumer's postal address. |
ContactFieldAll |
All the values above. |
If you set shipping details as a required field, you must also set the shippingType and the shippingMethods properties.
To set the shipping type:
applePayConfig.shippingType = ShippingTypeDelivery;
|
Parameter |
Description |
|---|---|
ShippingTypeShipping |
Shipping. The default value. |
ShippingTypeDelivery |
Delivery. |
ShippingTypeStorePickup |
Store Pickup. |
ShippingTypeServicePickup |
Service Pickup. |
Setting the shipping methods requires an array of PaymentShippingMethod objects.
To set an array of paymentShippingMethod objects:
NSDecimalNumber *deliveryCost = [NSDecimalNumber decimalNumberWithString:@"25.0"];

PaymentShippingMethod *delivery;
delivery = [[PaymentShippingMethod alloc] initWithIdentifier:@"delivery"
detail:@"Deliver to your address"
        label:@"Delivery"
        amount:deliveryCost];
applePayConfig.shippingMethods = @[delivery];
Getting the Billing and Shipping Details
To get the billing and shipping information back from the consumer:
Set the returnedContactInfo:
applePayConfig.returnedContactInfo = ReturnedInfoBillingContacts;
|
Parameter |
Description |
|---|---|
ReturnedInfoBillingContacts |
Billing details returned. The default value. |
ReturnedInfoShippingContacts |
Shipping details returned. |
ReturnedInfoAll |
Billing and Shipping details returned. |
Displaying PayByBankApp as a Payment Method for iOS
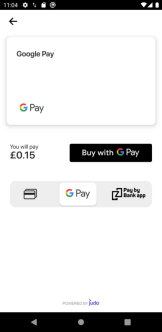
To display the PayByBankApp as a Payment Method for iOS:
-
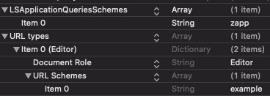
In the info.plist of app and LSApplicationQueriesSchemes add the URL scheme of the merchant(CFBundleURLSchemes)::
<key>CFBundleURLTypes</key>
    <array>
        <dict>
            <key>CFBundleTypeRole</key>
            <string>Editor</string>
            <key>CFBundleURLSchemes</key>
            <array>
                <string>judo</string>
            </array>
        </dict>
    </array>
    <key>LSApplicationQueriesSchemes</key>
    <array>
        <string>zapp</string>
    </array>
-
Add deeplink to the pbbaConfiguration object:
self.pbbaConfig = [JPPBBAConfiguration new];
self.pbbaConfig.deeplinkScheme = @"judo://pay";
-
To enable the PayByBankApp set the following options:
-
Add the pbba method to:
The paymentMethods array in JPConfiguration
-
Set currency:
GBP
-
Not using the Mobile SDK Payments Widget?
To Integrate directly to your app:
Prerequisites
-
"Bank3 Test App" - Contact: developersupport@judopayments.com to get access, so you can test the PayByBankApp flow.
-
You have set your app's URL Scheme.
-
You have added zapp to the ApplicationQueriesSchemes:
An example of the Info.plist file:
To integrate with the Judopay SDK directly to your iOS app, you can use either a:
-
basic authorization
This uses a token and secret
-
session authorization
This uses a token and paymentSession
You can select the sandbox mode for testing purposes.
Set the value:isSandboxed = true
let authorization: JPAuthorization = JPBasicAuthorization(token: JUDO_TOKEN,
  andSecret: JUDO_SECRET)
        judoKit = JudoKit(authorization: authorization)
        judoKit.isSandboxed = true
Step 2: Check for Installed Bank Apps
To ensure a good customer experience, it is recommended to only display the PayByBankApp button when the consumer has a compatible mobile Banking app.
Before adding the PayByBankApp button in Step 3, check if any compatible PayByBankApp Bank apps are installed, using the JudoKit isBankingAppAvailable method:
if (JudoKit.isBankingAppAvailable()) {
    // Add the PBBA button
}
Step 3: Adding the PayByBankApp Button
We recommend you use the branded button to invoke a PayByBankApp transaction, however it is not mandatory.

The PayByBankApp Button uses the delegate property.
The delegate property points to any class that implements the JPPBBAButtonDelegate interface:
let pbbaButton = JPPBBAButton(frame: container.bounds);
    pbbaButton.delegate = self
        view.addSubview(pbbaButton)
The JPBBAButton is a subclass of UIView, not UIButton.
Take this into consideration when integrating the PayByBankApp button via the Interface Builder.
The JPPBBAButtonDelegate interface has only one method: pbbaButtonDidPress(sender:), which is responsible for handling the button tap action.
Recommended PayByBankApp Button Size:
-
Minimum: Width 160pt | Height 40pt
-
Maximum: Width 310pt | Height 48pt
Step 4: Adding the Delegate Method
The delegate method is responsible for the button tap action.
To add the delegate method:
-
Call the invokePBBA method in the Judopay SDK and provide the required configuration parameters:
func pbbaButtonDidPress(_ sender: JPPBBAButton) {

    let amount = JPAmount(AMOUNT_VALUE, currency: "GBP")
    let reference = JPReference(consumerReference: CONSUMER_REF)

    configuration = JPConfiguration(judoID: JUDO_ID, amount: amount, reference: reference)

    let pbbaConfiguration = JPPBBAConfiguration()
    pbbaConfiguration.mobileNumber = YOUR_MOBILE_NUMBER
    pbbaConfiguration.emailAddress = YOUR_EMAIL_ADDRESS
    pbbaConfiguration.appearsOnStatement = YOUR_APPEARS_ON_STATEMENT
    pbbaConfiguration.deeplinkScheme = YOUR_DEEPLINK_SCHEME

    configuration.pbbaConfiguration = pbbaConfiguration

    judoKit.invokePBBA(with: configuration) { [weak self] (response, error) in
        if let response = response {
            // Handle response
        }

        if let error = error {
            // Handle error
        }
    }
}
-
Each Judopay transaction takes a JPConfiguration instance as a parameter.The configuration object sets up all the required parameters for a successful transaction. It also sets any optional parameters which you can configure to personalise the payment flow.
-
PayByBankApp transactions require some extra parameters to be set up, in addition to the basic transaction configuration. These optional parameters are defined in the JPPBBAConfiguration class, and used to add additional information to the transaction. The following two parameters are recommended:
-
deeplinkScheme
-
deeplinkURL
-
-
Call the invokePBBA method from the Judopay SDK.
The PayByBankApp flow will be triggered, opening the Bank app for consumers to make their transactions.
The deeplinkScheme
A deeplinkScheme identifies your app during the redirect process. When a consumer has completed their transaction using their Bank app, the Bank app will attempt to redirected the consumer back to your app.
The deeplinkScheme name should match the URL scheme defined in the Info.plist file.
For example: myapp -> myapp:/
The deeplinkURL
The deeplink URL enables the app to open the consumer's mobile Banking app, so they can complete the transaction.
When the Bank app redirects the consumer back to your app, it also provides you with a URL that you can use to poll the transaction status.
Add the deeplinkURL to the main configuration object. This will be sent as a parameter to the transaction method.
For more details, see Step 5: Handling the deeplinkURL.
It is a good idea to handle the errors within this step.
The most important information from the response is the orderId, accessed via response.orderDetails.orderId.
The orderId is used to manually check the transaction status.
For more details, see Manually Checking the Transaction Status.
Step 5: Handling the deeplinkURL
Following the completed transaction, the bank flow will be triggered when the invokePBBA method is called, even if the deeplinkURL parameter is not provided.
However, if the deeplinkURL parameter is provided, calling invokePBBA will trigger the transaction status polling logic.
To handle the deeplinkURL:
-
Listen to this event.
-
Capture the redirect URL.
To capture the redirect URL:
-
In your AppDelegate file, add the following methods:
-
application(_:open:options:)
-
application(_:didFinishLaunchingWithOptions:)
-
func application(
    _ application: UIApplication,
    didFinishLaunchingWithOptions launchOptions: [UIApplication.LaunchOptionsKey: Any]?
    ) -> Bool {

     if let url = launchOptions?[.url] as? URL {
         UserDefaults.standard.set(url, forKey: "deeplinkURL")
     }

     ...
}

func application(
    _ app: UIApplication, open url: URL,
    options: [UIApplication.OpenURLOptionsKey : Any] = [:]
    ) -> Bool {

     UserDefaults.standard.set(url, forKey: "deeplinkURL")

     ...
}-
Pass the URL to the JPPBBAConfiguration instance.
For the purpose of this exercise, the deeplinkURL is saved in the app's UserDefaults.
You can save the deeplinkURL in the Keychain or any alternative.
Step 6: Polling the Transaction Status
Once the Bank app has redirected the consumer back to your app, you can start polling the transaction status.
To start the PayByBankApp polling status:
-
Add the deeplinkURL to the configuration
-
Call the invokePBBA(configuration:) method:
func handleDeeplink() {
     guard let url = UserDefaults.standard.url(forKey: "deeplinkURL") else {
         return
     }

     configuration.pbbaConfiguration?.deeplinkURL = url

     judoKit.invokePBBA(with: configuration) { [weak self] (response, error) in
         if let response = response {
             // Handle response
         }

         if let error = error {
             // Handle error
         }
     }
 }
-
In the JPResponse object, you can inspect the orderDetails containing information about the transaction status.
Another option is to put a check in your viewDidAppear(animated:) method.
If a deeplinkURL is set up, add it to the configuration and call the invokePBBA(configuration:) method again. This will start the polling status.
Manually Checking the Transaction Status
There may be cases where the Bank app closes before the transaction flow completes. This would mean the deeplinkURL is not returned and the polling process to check the transaction status will not begin.
To manually check the transaction status:
-
Invoke a manual order status request:
Use the JPApiService to invoke a manual order status request.
-
Get the orderId from the initial request:
When the Bank app is invoked during the PayByBankApp request, (Step 4) the orderId is captured from the callback response:
judoKit.invokePBBA(with: configuration) { [weak self] (response, error) in
    if let response = response {
        let orderId = response.orderDetails?.orderId
            // Persist the orderId for later use
}
}
-
Use the orderId to manually check the transaction status:
Create an instance of JPApiService
You would do this in the same way as Initialising the Judopay SDK, see Step 1: Initialising the SDK.
-
Call the invokeOrderStatus method, with the orderId:
let apiService = JPApiService(authorization: authorization, isSandboxed: true)

    apiService.invokeOrderStatus(withOrderId: orderId) { (response, error) in
    // Handle response
}
The response will contain both the transaction status, and the order details of the transaction.
For a sample app, see Judopay's Judokit for iOS on Github.
Displaying iDEAL as a Payment Method for iOS
To add iDEAL support to your Payments Widget, set:
-
Currency code to EUR (Euro)
-
The
judoIdparameter in the JPConfiguration instance:
An example of a valid iDEAL configuration:
configuration.judoId = @"my-judo-id";Once the currency and judoId are set, iDEAL will be available as a payment method in the Payments Widget.
Going Live with iOS
Point to the Live Environment
-
In ViewController delete the line that specifies the targeted environment:
self.judoKitSession.apiSession.sandboxed = YES;
-
Replace your sandbox API Token and Secret for the live API Token and Secret
Find these in JudopayPortal > Your apps > {app name} > Live Tokens
self.judoKitSession = [[JudoKit alloc] initWithToken:token secret:secret];
Test live payments
Use the live environment for testing before deploying your app.
-
Ensure the SDK is properly configured for the live environment
-
Use real debit or credit cards
-
Test cards provided will not work in live
-
We recommend to perform pre-authorizations followed by a void, or regular payments followed by a refund
-
-
Send a refund through the JudopayPortal > History
-
-
Test all payment scenarios and security features to verify the expected behaviour