Web Payments
Web Payments is not the same as using the Web SDK.
With Judopay’s Web Payments solution, a minimal integration is all that is required to enable you to take a payment. With 3D Secure 2 built-in and easily enabled, this also ensures your payments meet the 3D Secure 2 (SCA) compliance requirement.
Generate hosted payment page links using Judopay’s Transaction API and redirect the consumer back to your own website, using configured redirect URLs configured redirect URLs. This helps minimise your PCI scope by providing consumers with a secure way to pay online via their browser, optimised for any device. To specify the successUrl and cancelUrl, see Web Payments Set Up.
You can customise which screens are visible to the consumer during their payment journey. For more information, see Payment Journey Screen Customisation.
Web Payments enables the following payment methods:
- Apple Pay™
- Google Pay™
- PayPal (BETA)
as well as offering consumers the traditional pay with card payment method.
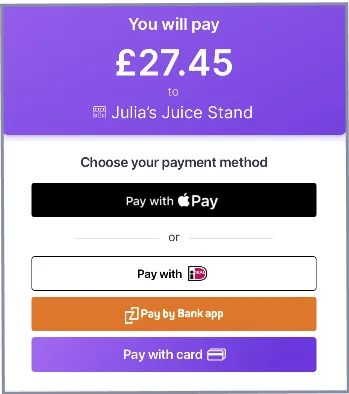
Integrating Web Payments
Prerequisites
Make sure you are using Judopay's API version 6.0.0.0 or higher.
- We recommend using the latest API Version.
- To check which API version you are on, see the version value set in your API integration code (the Api-Version HTTP request header).
- We recommend setting up Webhooks to notify your system with transaction status updates.
If you set up webhooks for transaction status updates, be aware this is a separate, independent service from using the configured successUrl / cancelUrl redirects.
- Make sure you have set up Web Payments for your app in the Judopay Portal.
- Configure the HTTPS success and failure URLs (see Step 4 below).
- Redirections to the Web Payments URL should utilise the HTTP GET method to align with expected behaviour and ensure best practice.
Web Payments Set Up
Web Payments do not apply for Mobile and your Server Side or Mobile only integrations.
To set up Web Payments:
- Log in to the Judopay Portal.
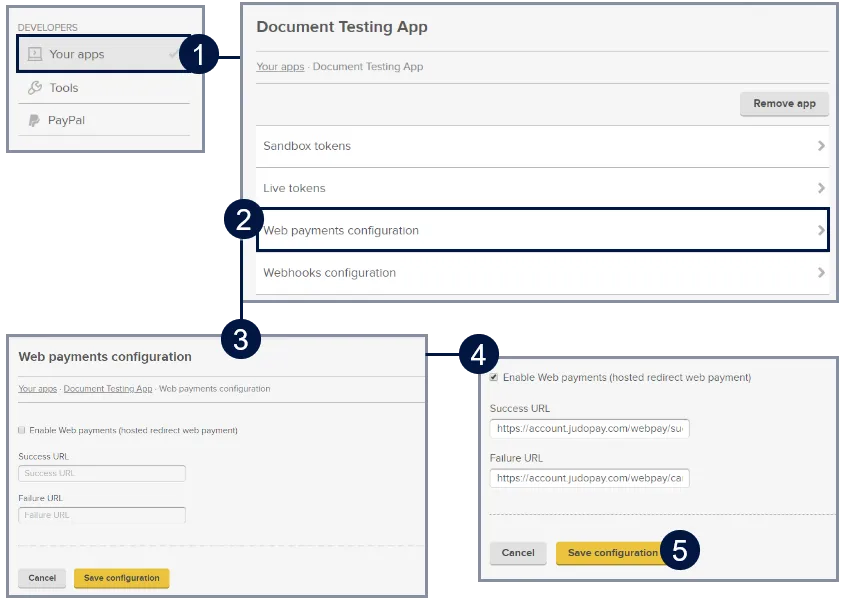
From the side menu, select Your apps. Select the app you wish to edit. For the purpose of this exercise, Document Testing App is selected. This configuration is to be set up for each of your web payments apps.
Select Web payments configuration.
The Web payments configuration screen appears.
Select the Enable Web payments (hosted redirect web payment) tickbox. Specify the Success and Failure URLsSuccess and Failure URLs. (Depending on the transaction result, this is where the consumer will be redirected once the transaction process is completed).
NOTE: You can set up the same success and failure URLs for both the Sandbox and Live environments. For this to work as expected, when setting up Web Payments for your application in the Judopay Portal, you must create a separate application for each environment.
Click Save configuration.
Success and Failure URLs
The successUrl and cancelUrl configuration, controls where the consumer's browser is redirected after completing or cancelling the payment on the hosted page. These redirect URLs are unrelated to the Webhooks service. If you need a server-to-server, authenticated JSON notification, configure a Webhookconfigure a webhook separately in the portal separately in the Judopay Portal. This will fire independently from PayByLink.
Success and Failure URLs should be configured using the HTTPS protocol. This will prevent the browser’s pop-up messages, warning the consumer of insecure connectivity.
Web Payments Flow
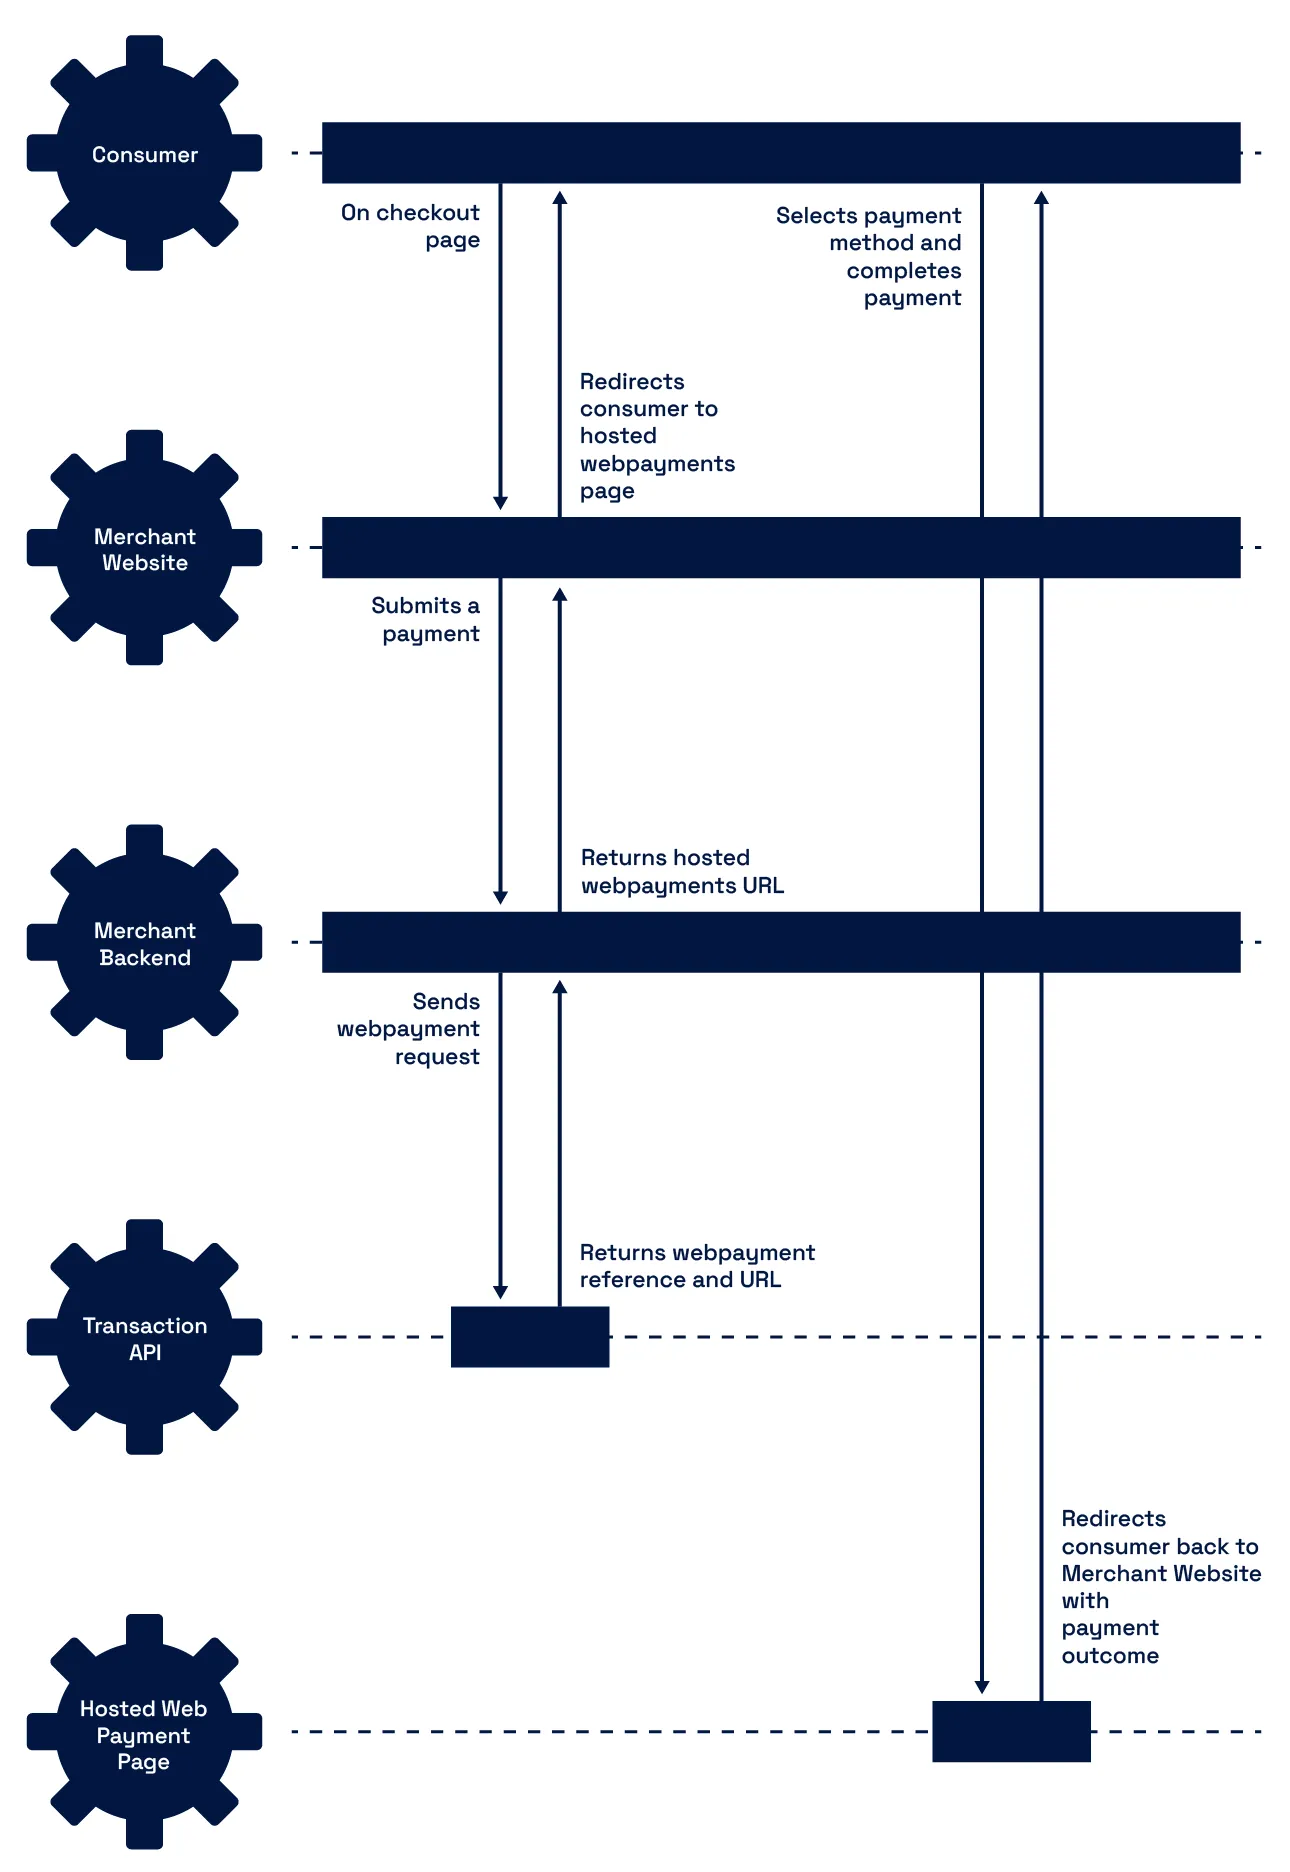
Web Payments - Payment Request
You can also create a Web Payments:
The CheckCard request is similar to the PreAuth request, just remove the amount field.
Step One: Generate a Web Payments Link
Make sure you are using Judopay's API version 6.0.0.0 or higher.
To generate the Web Payments link:
- Create a web payments payment session:
- Make a HTTP POST Request: /paymentsession
Important to Consider:
- The paymentSession can be used for up to three transaction attempts for the same transaction.
- If the block duplicate transactions permission has been enabled on your API tokens, the paymentSession can only be used for one transaction attempt.
We recommend using a dedicated API token for Web Payments integrations. This will avoid the possibility of duplicate transactions occuring for other integrations.
You can also use the following: HTTP POST Request: https://api-sandbox.judopay.com/webpayments/payments
For the full schema details and descriptions, see Transaction API: webpayments/payments
{
"judoId": "yourJudoId",
  "yourConsumerReference": "yourConsumerReference",
  "yourPaymentReference": "yourPaymentReference",
  "yourPaymentMetaData": {
    "internalLocationRef": "Example",
    "internalId": 99,
    "hideBackButton": true
  },
  "currency": "GBP",
  "amount": 12.99,
  "cardAddress": {
    "address1": "CardHolder House",
    "address2": "1 CardHolder Street",
    "town": "CardHolder Town",
    "postCode": "AB1 2CD",
    "countryCode": 826,
    "state": "FL",
    "cardHolderName": "John Doe"
  },
  "expiryDate": "2028-02-05T16:28:32.8596+00:00",
  "isPayByLink": false,
  "isJudoAccept": false,
  "successUrl": "https://my.site.com/success",
  "cancelUrl": "https://my.site.com/cancel",
  "emailAddress": "[email protected]",
  "mobileNumber": "7999999999",
  "phoneCountryCode": "44",
  "threeDSecure": {
    "challengeRequestIndicator": "challengeAsMandate"
  },
  "hideBillingInfo": true,
  "hideReviewInfo": true,
  "primaryAccountDetails": {
    "name": "Doe",
    "accountNumber": "12345678",
    "dateOfBirth": "1980-01-31",
    "postCode": "AB1 2CD"
  }
}
*Mastercard Recommends: These fields are recommended rather than mandatory. Transactions will continue to be processed if not supplied. See, Mastercard Recommended 3D Secure 2 Fieldsdd.
Parameter | Description |
|---|---|
judoId String Required | Unique ID supplied by Judopay. Specific to a merchant and/or location. Format:
|
amount Decimal Required | The amount to process. Format:
For currencies using a different structure please contact Judopay for support. For checkCard requests, remove the amount field. |
currency String Required | The currency of the transaction. Any ISO 4217 alphabetic currency code:
|
phoneCountryCode String Recommended * | The country code of the consumer's phone. Format:
Must be set if mobileNumber is set. If not set, default = 44 |
yourConsumerReference String Required | Unique reference to anonymously identify your customer. Advisable to use GUIDs. Must be below 40 characters. |
yourPaymentReference String Required | Your unique reference for this payment. Format:
This value should be unique in order to protect your customers against duplicate transactions. With a server side integration, if a payment reference is not supplied, the transaction will not be processed. |
cardAddress Object Optional | Card holder's address. Values:
If the cardAddress is provided, the postcode is required. |
mobileNumber String Recommended * | Consumer’s valid mobile number. Mastercard recommends providing at least one contact method for Mastercard 3D Secure authenticated transactions. Format:
Must be set if phoneCountryCode is set. |
emailAddress String Recommended * | Consumer’s valid email address. Mastercard recommends providing at least one contact method for Mastercard 3D Secure authenticated transactions. |
primaryAccountDetails Object Optional | This is Mandatory for merchants who have an MCC code of 6012, 6051 and 7299. Primary Account Holder Details:
|
expiryDate String Optional | Date and time of expiry. The default is 30 minutes from creation. |
isPayByLink Boolean Optional | Flag indicating whether this session should be shown in the Pay By Link section in the Judopay Portal. Default = false |
isJudoAccept Boolean Optional | Flag indicating whether this session should be shown in the Judo Accept section in the Judopay Portal. Default = false |
successUrl String Optional | This is the URL to which the consumer is redirected if their transaction is successful. If not set, then the default success url specified on your account is used. Format:
|
cancelUrl String Optional | This is the URL to which the consumer is redirected if they cancel the transaction or if the transaction fails. If not set, then the default cancel url specified on your account is used. Format:
|
hideBillingInfo Boolean Optional | This flag can be used to determine whether the 'Billing information' page is shown on the Webpayments UI. Default = true |
hideReviewInfo Boolean Optional | This flag can be used to determine whether the 'Review and Confirm' page is shown on the Webpayments UI. Default = true |
threeDSecure Object Optional | challengeRequestIndicator Indicates the type of challenge request you wish to apply. Values:
scaExemption To apply for an exemption from SCA, for a customer initiated transaction. Values:
|
Send the link URL (in the response example above), to the consumer. The reference has an expiration time of 30 minutes. If the transaction is not completed within this time, the transaction will fail and the status = Expired.
Step Two: Consumer Submits a Payment
- Using the web payment reference / URL generated in Step One: Generate a Web Payments Link send the payment link to the consumer.
- The consumer clicks the link, and is re-directed to the payment form.
- The payment form (which is hosted by Judopay), allows the consumer to submit a payment.
Example Payment Flow
Below is an example of a consumer's payment flow within Judopay's hosted payments page:
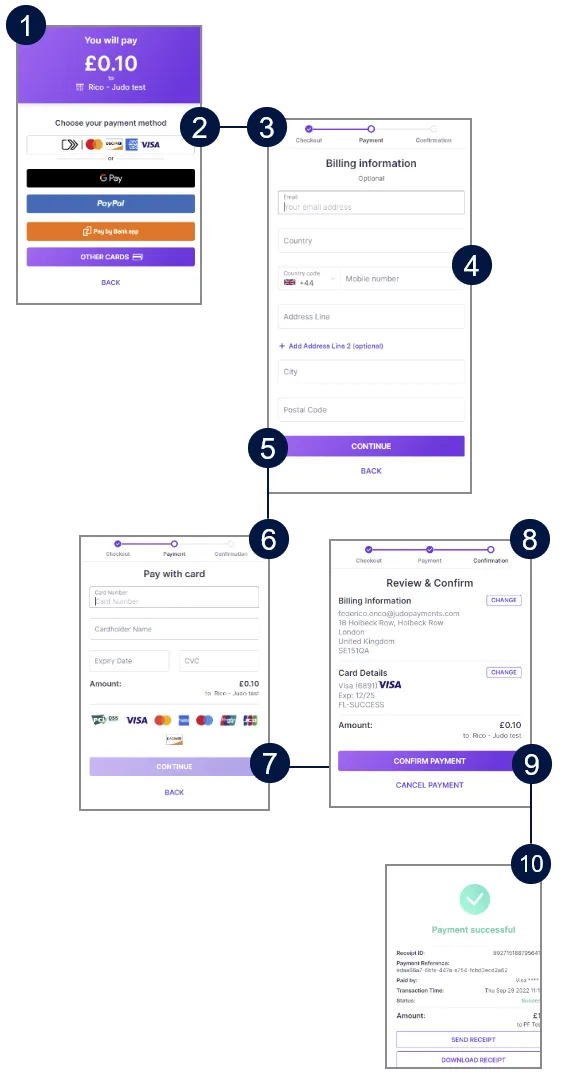
The consumer is re-directed to the hosted payments page. The amount to pay is displayed, including all available payment methods.
This screen is only displayed when there are multiple payment methods offered.
Redirections to the Web Payments URL should utilise the HTTP GET method to align with expected behaviour and ensure best practice.
For the purpose of this exercise, Pay with card is selected.
The Billing Information screen appears. The Billing Information screen can be hidden, see Hide the Billing Information Screen.
For MOTO consumers, the Billing Information and Review & Confirm screens will not be displayed. The consumer will be directed straight to the Pay with Card screen.
The consumer enters their billing information. Entering the billing information is optional. In order for the address to be used, all the mandatory fields in the billing information page must be completed by the consumer:
- address line 1
- town
- country See here for the list of valid ISO 3166-1 format country codes.
- state (if country = Canada/USA)
- postcode
Tap Continue.
The Pay with Card screen appears. The consumer enters their card details.
Tap Continue.
The Review & Confirm screen appears. The Review & Confirm screen can be hidden, see Hide the Review & Confirm Screen.
For MOTO consumers, the Billing Information and Review & Confirm screens will not be displayed. The consumer will be directed straight to the Pay with Card screen.
Tap Confirm Payment to pay. The consumer can tap the Change button to edit their card details / billing information.
The Payment Successful screen appears. The payment information is displayed. You can redirect the consumer to a Success / Cancel URL, see Step Three: Handle the Response.
Step Three: Handle the Response
The consumer is redirected to the outcome screen.
The attributes set in the request body will determine where the consumer is redirected. If "isPayByLink": false, the consumer will be directed to the success / cancel url's you set in the payload, as shown below. Any url configurations set in your API token, will be ignored.
If "isPayByLink": true, the consumer will be directed to Judopay's default success / cancel screens. Any url configurations set in your API token, or in the payload will be ignored.
If "isPayByLink": false, and the urls have not been added to the request, the consumer will be directed to Judopay's default success / cancel screens. Any url configurations set in your API token will be ignored.
To specify the successUrl and cancelUrl, see Web Payments Set Up.
For more information on common error scenarios and to troubleshoot errors, see Troubleshooting.
Web Payments - PreAuth Request
Use webpayments/preauths to reserve funds on a consumer's account.
PreAuths will postpone the completion of the transaction until the goods have been delivered or the service fulfilled.
To create a preAuth request:
- Follow Web Payments - Payment Request
- Change the request URL to: https://api-sandbox.judopay.com/webpayments/preauths
For the full schema details and descriptions, see Transaction API: Transaction API Reference
Web Payments - CheckCard Request
Use webpayments/checkcard to perform a zero amount pre-authorisation (0 Auth). CheckCard also enables you to check the validity of the card, to be used for future payments.
To create a checkcard request:
- Follow Web Payments - Payment Request
- Change the request URL to: https://api-sandbox.judopay.com/webpayments/checkcard
- Remove the amount field from the request object.
For the full schema details and descriptions, see Transaction API: Transaction API Reference
Monitoring Transaction Information
Do not confuse reference with yourPaymentReference.
reference: push and pull information with our API. yourPaymentReference: a variable to track the transaction.
Check Transaction Result
The paymentSession can be used for up to three transaction attempts for the same transaction. Check the noOfAuthAttempts field in the response to determine the number of transaction attempts.
- Send a request to our API using the reference from Judopay's response.
- Make a HTTPS GET Request: https://api-sandbox.judopay.com/webpayments/{reference}
//You will receive the following transaction receipt information:
"status": "Success",
    "shortReference": "kyldmO",
    "amount": 399,
    "companyName": "My Company",
    "currency": "GBP",
    "expiryDate": "2030-12-07T18:28:32.8596+00:00",
    "judoId": "100013531",
    "paymentCancelUrl": "https://judopay.com",
    "paymentSuccessUrl": "https://judopay.com",
    "reference": "6QcAAAcAAAACAAAACwAAAIgf-PCUS9UPbuk",
    "allowedCardTypes": [
        1,
        2,
        3,
        8,
        10,
        11,
        12,
        13
    ],
    "response": {
        "postUrl": "https://pay-sandbox.judopay.com/v2",
        "reference": "6QcAAAcAAAACAAAACwAAAIgf-PCUS9UPbuk"
    },
    "transactionType": "Payment",
    "yourConsumerReference": "tk-test-2025-07-02",
    "yourPaymentReference": "tk-test-2025-07-02-05",
    "webPaymentOperation": 0,
    "isJudoAccept": false,
    "isThreeDSecureTwo": true,
    "noOfAuthAttempts": 1,
    "receipt": {
        "receiptId": "1257662426096709632",
        "yourPaymentReference": "tk-test-2025-07-02-05",
        "type": "Payment",
        "createdAt": "2025-07-02T12:41:28.6095+01:00",
        "result": "Success",
        "message": "AuthCode: 321116",
        "judoId": 100013531,
        "merchantName": "John Doe",
        "appearsOnStatementAs": "APL*/JohnDoe         ",
        "netAmount": "399.00",
        "amount": "399.00",
        "currency": "GBP",
        "acquirerTransactionId": "74450001183715833468",
        "externalBankResponseCode": "",
        "authCode": "321116",
        "postCodeCheckResult": "Unknown",
        "acquirer": "Cashflows",
        "webPaymentReference": "6QcAAAcAAAACAAAACwAAAIg",
        "noOfAuthAttempts": 1,
        "cardDetails": {
            "cardLastfour": "3436",
            "endDate": "1230",
            "cardToken": "SOF-OKNnyt-4RA-pCpKtsQabeg",
            "cardType": 11,
            "cardScheme": "VISA",
            "cardFunding": "Debit",
            "cardCategory": "",
            "cardCountry": "FR",
            "bank": "CREDIT INDUSTRIEL ET COMMERCIAL",
            "cardHolderName": "Challenge Required"
        },
        "billingAddress": {},
        "consumer": {
            "yourConsumerReference": "tk-test-2025-07-02"
        },
        "yourPaymentMetaData": {
            "customerEmail": "[email protected]",
            "policy_id": "policy001",
            "country_origin": "PL"
        },
        "threeDSecure": {
            "attempted": true,
            "result": "PASSED",
            "challengeRequestIndicator": "ChallengeAsMandate",
            "eci": "05"
        },
        "risks": {
            "postCodeCheck": "UNKNOWN",
            "cv2Check": "PASSED",
            "eciIndicator": "05",
            "merchantSuggestion": "Allow"
        }
    }
}
For the full schema details and descriptions, see Transaction API: webpayments/payments/{reference}
- We would also recommend setting up Webhooks to notify your system with real-time transaction status updates. Check the webhook message "result" field for the status.
If you set up webhooks for transaction status updates, be aware this is a separate, independent service from using the configured successUrl / cancelUrl redirects as described aboveabove.
For the purpose of this exercise, the following examples indicate a Success and Card declined webhook message scenario:
The webhook message will make four attempts to be delivered. Following this, the message will fail to deliver and be dropped.
- To query transactions, make a HTTPS GET request: /transactions
- Use the paymentReference, or consumerReference fields.
- Use the yourPaymentMetaData array to include enhanced data for each payment:
Check Transaction Receipt
We recommend displaying the following order information on your receipt screen:
- Date and Time
- Amount
- Result (Success or Failure message)
- appearsOnStatementAs (This will appear on your card statement as ….)
Setting up an Incremental Authorisation
The incremental authorisation feature allows you to increment the value of your original pre-authorisation for scenarios where you need to charge your customer a higher total amount.
By incrementing the pre-authorisation value, you will be able to capture the total amount that you wish to charge your customer when you are ready.
This feature is not available with all acquirers. Check with our customer service team, or your account manager for your eligibility to use this.
- The allowIncrement flag can be set as part of the payment session that is created when generating a web payment link for a preAuth
- Set the allowIncrement flag to true.
- This is set as part of the POST /webpayments/preauths request body.
Example:
{
  "judoId": "100100100",
  "yourConsumerReference": "2b45fd3f-cee5-4e7e-874f-28051db65408",
  "yourPaymentReference": "6482c678-cad3-4efd-b081-aeae7a89a134",
  "yourPaymentMetaData": {
    "internalLocationRef": "Example",
    "internalId": 99
  },
  "currency": "GBP",
  "amount": 10.99,
    "allowIncrement”: true,
  "cardAddress": {
    "address1": "CardHolder House",
    "address2": "1 CardHolder Street",
    "town": "CardHolder Town",
    "postCode": "AB1 2CD",
    "countryCode": "826",
    "cardHolderName": "John Doe"
  },
  "expiryDate": "2028-02-05T16:28:32.8596+00:00",
  "isPayByLink": true,
  "emailAddress": "[email protected]",
  "mobileNumber": "7999999999",
  "phoneCountryCode": "44",
  "threeDSecure": {
    "challengeRequestIndicator": "challengeAsMandate"
  }
}
Voiding an Incremental Authorisation Transaction
Each incremental authorisation generates its own receiptId.
If an authorisation has been incremented, any subsequent void request must reference the receiptId of the original pre-authorisation transaction.
Using the receiptId returned following an incremental authorisation will result in an error.
The void amount must be the sum of the original authorisation amount and all successful increments. Any attempt to process a partial void, the sum of any but not all authorisations and increments, will result in an error.
For example:
- Initial preAuth: £100
- incrementalAuth request amount: £20
- incrementalAuth request amount: £30
- Total authorised amount after increments: £150
To void this transaction:
- Use the receiptId of the Initial preAuth.
- Submit a void request for £150.
Payment
Journey Screen Customisation
The web payments card payment journey consists of the following steps:
- Select payment method
- Enter billing information (Optional)
- Enter card details
- Review and Confirm (Optional)
You can customise whether to display the billing information, the Review & Confirm screens and the Back button to the consumer during their payment journey.
Hide the Billing Information Screen
For MOTO consumers, the Billing Information screen will not be displayed. The consumer will be directed straight to the Pay with Card screen
Set the hideBillingInfo flag when creating the payment session. The billing information screen will be hidden.
- Create a web payment session where hideBillingInfo = true
- The consumer is directed to the card payment screen.
Hide the Review & Confirm Screen
For MOTO consumers, the Review & Confirm screen will not be displayed. The consumer will be directed straight to the Pay with Card screen.
Set the hideReviewInfo flag when creating the payment session. The Review & Confirm screen will be hidden.
- Create a web payment session where hideReviewInfo = true
- The consumer will not be directed to the Review & Confirm screen during the payment flow.
The hideBillingInfo and hideReviewInfo flags can be used in combination, by setting both flags.
Hide the Back Button
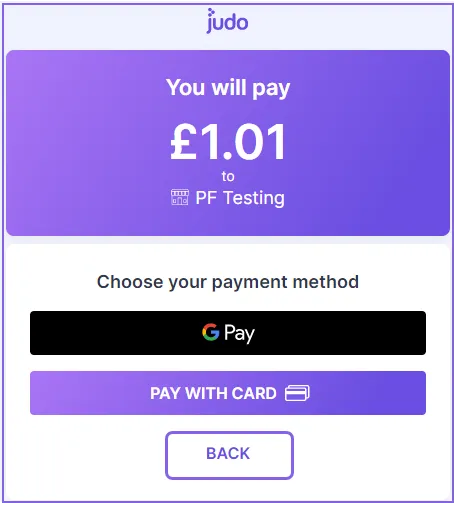
In the yourPaymentMetaData block, set the hideBackButton flag to true when creating the payment session. The Back button will be hidden.
- Create a web payment session where hideBackButton = true
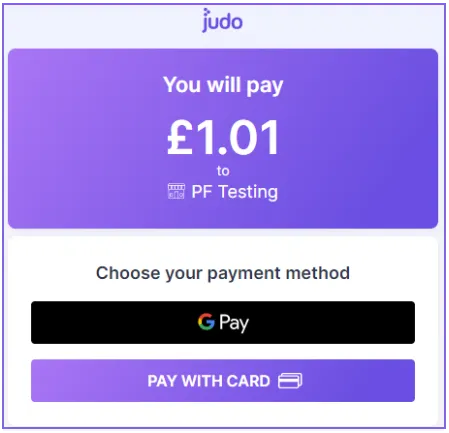
- The Back button will not be displayed on the landing page:
Pre-fill the billingAddress / cardHolder address
If you set cardAddress when creating the payment session, the billing information screen will be hidden.
We will use the latest address provided when processing the payment.
If required, the consumer can edit the address when they reach the Review & Confirm screen:
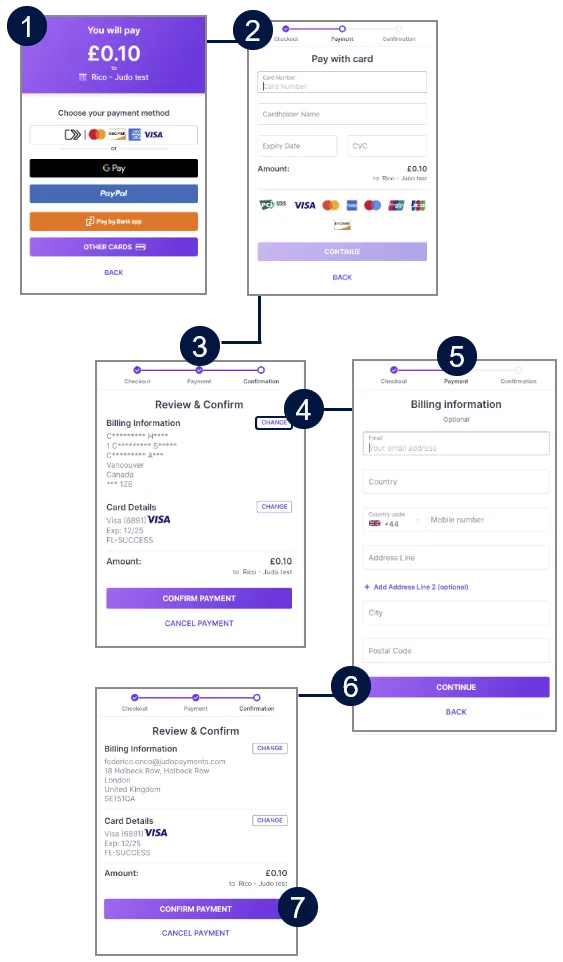
The consumer is directed to the payment method screen. For the purpose of this exercise, the billing address has been supplied by the merchant when creating the payment session.
The consumer is directed to the card payment screen.
The Review & Confirm screen displays the address as supplied by the merchant when creating the payment session.
The consumer taps the CHANGE button to edit the billing information.
The consumer is directed to a blank billing information page.
The consumer edits the billing details and taps the CONTINUE button.
All the mandatory fields in the billing information page need to be completed by the consumer, otherwise the address will not be updated: (address line 1 | town | country | (state if country = Canada/USA), | postcode).
See here for the list of valid ISO 3166-1 format country codes.
The billing information (from step 3) has been replaced with the new address details. Tap the CONFIRM PAYMENT button.
Adding Payment Methods
You can enable alternative payment methods, as well as offering consumers the traditional pay with card payment method.
There is no additional integration required, just contact customer support to enable this for you.
Testing your Integration
- Ensure the project is configured for the sandbox environment.
- You will need your Authentication Methods.
- Use the Test Cards provided.
For more information, see Testing Web Payments - Card Payments.