Token Payment Request
Creating a Token Payment Request with the Web SDK
Supports token payment and token preAuth.
Do you have a stored card wallet for existing customers, making use of card tokens? Using our Web SDK, you will also be able to invoke a customer-initiated payment using a card token, to handle:
- payments
- preAuths
- 3D Secure challenges
Step One: Setting up the Web SDK
To invoke a customer-initiated transaction using a card token, follow the below steps from Creating a 3D Secure 2 Payment with the Web SDK:
The payment form iFrame must be loaded onto the page in order for payments to work. However displaying the form to the consumer is not required for this transaction type.
To hide the payment form iFrame, use: <div id="payment-iframe" style="position:absolute;width:0;height:0;border:0;"></div>
Step Two: Making a Token Transaction
To make a token transaction:
- Define the tokenConfiguration object for the token payment or token preAuth.
Ensure the details used when creating the paymentSession match the values set in the following configuration:
const tokenConfiguration = {
     judoId: "youJudoId",
     amount: 12.99,
     currency: "GBP",
     phoneCountryCode: "44",
     mobileNumber: "07999999999",
     emailAddress: "[email protected]",
     challengeRequestIndicator: "challengeAsMandate",
     initialRecurringPayment: false,
     yourConsumerReference: "yourConsumerReference",
     yourPaymentReference: "yourPaymentReference",
     billingAddress: {
             address1: "My House",
             address2: "My Street",
             town: "My Town",
             state: "My State", //Mandatory for US and Canada
             country: "826",
             postCode: "TR14 8PA"
             },

   // Token specific params (above are the same as the paymentConfiguration)
   cardToken: "yourCardToken", //mandatory
   shouldVerifySecurityCode: true,
   cardHolderName: "Consumer Name", //optional, allows you to provide the consumers' name without needing to prompt them to enter it.
   shouldVerifyCardHolderName: true //You can use cardHolderName OR shouldVerifyCardHolderName - NOT both
}
See below for more details on the parameters that create the tokenConfiguration object:
*Mastercard Recommends: These fields are recommended rather than mandatory. Transactions will continue to be processed if not supplied. See, Mastercard Recommended 3D Secure 2 Fieldsdd.
Parameter | Description |
|---|---|
cardToken String Required | A randomly generated string linked to the saved card stored in Judopay’s system. |
shouldVerifySecurityCode Boolean Optional | Indicates if the consumer will be prompted to enter their security code. Default value = true |
securityCode String Optional | The 3/4 digit security code associated with the consumer’s saved card. This value will be overwritten if the user is prompted to enter their own value: (shouldVerifySecurityCode=true). |
cardHolderName String Recommended * | Allows you to provide the consumers' name without needing to prompt them to enter it. Note: You can use cardHolderName OR shouldVerifyCardHolderName - NOT both. |
shouldVerifyCardHolderName Boolean Optional | Indicates if the consumer will be prompted to enter their card holder name. If the user is prompted to enter their card holder name AND you have provided cardHolderName in the config, the config value will be overwritten. Default value = false |
2. In a function, add the invokeTokenPayment call. This will invoke a payment using the paymentSession and tokenPaymentConfiguration.
function handleTokenPaymentButtonClick() {
    judo.invokeTokenPayment(paymentSession, tokenConfiguration)
    .then(handleSuccess)
    .catch(handleError)
}
To invoke a preAuth, change the above code to .invokeTokenPreauth.
To customise the style of the Token Details Modal Input, add an extra parameter to the invokeTokenPayment call: judo.invokeTokenPayment(paymentSession, tokenConfiguration, tokenDetailsModalStyle)
The tokenDetailsModalStyle is an object defining the style of the modal. For example:
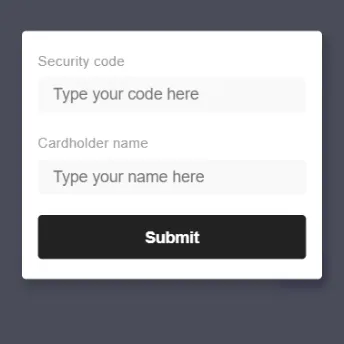
This object has been updated to include the fields: labelTextContent2 and inputPlaceholder2, which can be used to set the style for the cardHolderName input.
An example of the tokenDetailsModalStyle object:
//Here you can customise the Token Details Modal styles
const tokenDetailsModalStyle = {
    labelTextContent: 'Security code',
    inputPlaceholder: 'Type your code here',
    labelTextContent2: 'Cardholder name',
    inputPlaceholder2: 'Type your name here',
    buttonTextContent: 'Submit',
    style: {
        form: {
            padding: '20px 16px',
            maxWidth: '300px',
            margin: 'auto',
            width: '80%',
            borderRadius: '4px'
        },
        field: {
            width: '100%',
            padding: '8px',
            color: '#999999'
        },
        label: {
            width: '100%',
            padding: '8px 0px 8px 0px',
            color: '#999999'
        },
        button: {
            backgroundColor: '#222',
            borderRadius: '4px',
            borderStyle: 'none',
        }
    }
}
4. Add a token payment button: <button id="submit-token-payment-button" onclick="handleTokenPaymentButtonClick()"> Pay Now </button> When clicked, the function that invokes the token payment or token preAuth is called (in step 2 above).
Step Three: Handle the Response
All the Judopay Web SDK transaction methods return a promise. Once the authorisation is complete, the promise will be either fulfilled or rejected.
Fulfilled
- You will receive a JSON object response (a Judopay receipt object).
- Depending on the result the consumer should be redirected to the appropriate outcome page.
- For example, if the result = SUCCESS redirect the consumer to the Success Page.
- This page should display the necessary transaction information (found in the Judopay receipt object).
Rejected
- You will receive an error object
- The consumer should be redirected to an Error Page.
const onFulfillment = (receiptObject) => {
  const { result } = receiptObject
  //redirect to appropriate page depending on the result (success/failure/declined page)
}

const onRejection = (error) => {
  //redirect to error page and handle error
}
For more information on the response codes, see Codes.
Putting it all together
Putting it all together to set up the Web SDK and make a token transaction:
<html>
<head>
    <!-- Include JudoPay WebSDK -->
    <script src="https://web.judopay.com/js/0.0.31/judopay.min.js"></script>
    <script src="https://ajax.googleapis.com/ajax/libs/jquery/3.5.1/jquery.min.js"></script>
</head>
<body>

<!-- Where the Judopay iFrame will be loaded, but form is hidden for this example -->
<div id="payment-iframe" style="position:absolute;width:0;height:0;border:0;"></div>

<!-- Payment button for submitting token payment -->
<button id="submit-token-payment-button" onclick="handleTokenPaymentButtonClick()"> Pay Now </button>

<!-- Where the payment form errors will be shown -->
<div class="judopay-errors" style="color:red"></div>

<script>

    // Initializing/creating an instance of the Judopay webSDK
    var judo = new JudoPay("yourAPIToken", true);

    // Creating iFrame, but not including iFrame config parameter as form is hidden for this example
    var payment = judo.createCardDetails("payment-iframe");

    //Define config object for token payment/preauth
        const tokenConfiguration = {
        judoId: "yourJudoId",
        amount: 1.01,
        currency: "GBP",
        phoneCountryCode: "44",
        challengeRequestIndicator: "challengeAsMandate",
        initialRecurringPayment: false,
        yourConsumerReference: "yourConsumerReference",
        yourPaymentReference: "yourPaymentReference",
        billingAddress: {
            address1: "My house",
            address2: "My street",
            town: "My town",
            postCode: "TR14 8PA",
            country: "826"
        },
        mobileNumber: "07999999999",
        emailAddress: "[email protected]",

        //Token specific parameters
        cardToken: "yourCardToken",
        shouldVerifySecurityCode: true,
        shouldVerifyCardHolderName: true
    }

    function handleSuccess(response) {
        //Redirect to success page and handle response
    }
    function handleError(error) {
        //Redirect to error page and handle error
    }

    //Called when token payment button pressed to invoke payment
    function handleTokenPaymentButtonClick() {
        judo.invokeTokenPayment("yourPaymentSession", tokenConfiguration)
            .then(handleSuccess)
            .catch(handleError)
    }
</script>

</body>
</html>